Category: ajax
Posts
ajax跟蹤文件上傳進度條
(文件來源 http://www.ibm.com/developerworks/cn/opensource/os-php-v525/index.html) 2007 年 6 月 08 日 PHP V5.2 為開發人員添加了 hook 以利用實時跟蹤文件上傳進度的功能。本文是 系列文章(共五部分)的第 5 部分,將向您展示如何監視文件
Posts
利用 jQuery 及 Firebug 來 debug web
(引用 https://blog.ericsk.org/archives/790) 如同原文中的回應一樣,原作者實在太聰明了。 相信常在作 Web 開發的人常常會很苦惱 debug 這件事,尤其是用了一堆 ajax 後更是不容易,雖然用「泛mozi
Posts
[AJAX] 微妙的時間差
(引用 https://blog.ericsk.org/archives/800) Nice IE!Nice Firefox! Nice IE 最近在寫一些會用到 AJAX 的網頁,目前使用的 JavaScript framework 是 jQuery,於是乎,會有類似這樣(方便舉例而寫)的
Category: doctrine
Posts
Doctrine 2 Stable Release!!
2010-12-21 這天 Doctrin2 釋出正式穩定版.
Doctrine 2 First Stable Release
這個版本工程之浩大於2008就開始開發,歷經2年半的時間努力.核心開發團隊五人於最後一年最後整合應用保有 Doctrine 1功能並重構並且導入新的DataMapper.
What is new in Doctrine 2?
- DQL is now a real language inside Doctrine, based on an EBNF that is parsed and transformed to SQL. Benefits of this refactoring are readable error messages, the generation of an AST that allows us to support many different vendors and powerful hooks for developers to modify and extend the DQL language to their needs. DQL can either be written as a string or be generated using a powerful QueryBuilder object.
- Your persistent objects (called entities in Doctrine 2) are not required to extend an abstract base class anymore. Doctrine 2 allows you to use Plain old PHP Objects.
- The UnitOfWork is not an alibi-pattern as implemented in Doctrine 1. It is the most central pattern in Doctrine 2. Instead of calling save() or delete() methods on your Doctrine_Record instances you now pass objects to the data mapper object called EntityManager and it keeps track of all changes until you request a synchronisation between database and the current objects in memory. This process is very efficient and has consistent semantics. This is a significant improvement over Doctrine 1 in terms of performance and developer ease-of-use.
- There are no code-generation steps from YAML to PHP involved in the library anymore. YAML, XML, PHP and Doc-Block Annotations are four first-class citizens for defining the metadata mapping between objects and database. A powerful caching layer allows Doctrine 2 to use runtime metadata without relying on code-generation.
- A clean architecture and powerful algorithms make Doctrine 2 magnitudes faster than Doctrine 1.
- Doctrine 2 supports an API that allows you to transform an arbitrary SQL statements into an object-structure. This feature is used by the Doctrine Query Language itself and is a first-class citizen of the library. It essentially allows you to make use of powerful vendor-specific features and complex SQL statements without having to cirumvent the ORM completely.
- Inheritance is not akward anymore. There are now three different types of inheritance to choose from: Mapped Superclasses, Single-Table- and Joined-Table-Inheritance.
- Many more features, just see the reference guide on what is possible with Doctrine 2.
Posts
Doctrine 入門(一)
準備
依照之前整合的 Zend Framework 1.11.0 and Doctrine 1.2.3 and Smarty 3.0.4 環境,來做學習與測試.
更改index.php
  application.ini 環境


;Doctrine
autoloaderNamespaces[] = "Doctrine_"
pluginPaths.ZendX_Doctrine_Application_Resource = "ZendX/Application/Resource"
resources.doctrine.debug = 1
resources.doctrine.paths.models_path = APPLICATION_PATH "/../models"
resources.doctrine.connections.orm1.dsn.adapter = mysql
resources.doctrine.connections.orm1.dsn.user = "user"
resources.doctrine.connections.orm1.dsn.pass = "password"
resources.doctrine.connections.orm1.dsn.hostspec = "localhost"
resources.doctrine.connections.orm1.dsn.database = "orm1_sd_idv_tw"
Posts
Zend Framework 1.11.0 and Doctrine 1.2.3 and Smarty 3.0.4
懶惰許久~~ 趕快來補一下功課.
這篇主要介紹 Zend Framework 1.11.0 and Doctrine 1.2.3 and Smarty 3.0.4 的結合方式.
Doctrine 1.2.3 跟 Zend Framework 1.11.0 結合主要參考 http://pastie.org/481633 http://pastie.org/481635 使用.
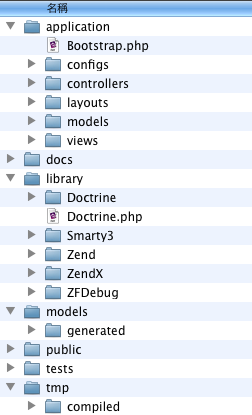
目錄結構:[
 ]1
]1
Posts
PHP: Doctrine
[][1][
![]() ]2 Doctrine project 始於 2006 年,2008 年開始受到矚目;網站訪客數從每日 300 人到上千人;亦可在網上搜尋到許多 Framework 整合教學文章,例如
]2 Doctrine project 始於 2006 年,2008 年開始受到矚目;網站訪客數從每日 300 人到上千人;亦可在網上搜尋到許多 Framework 整合教學文章,例如
Zend Framework、Symfony 及 CodeIgniter。
Doctrine 的主要開發者 Jonathan H Wage,今年 24歲,非常年輕。Wage 在 Symfony 創始者的資助下成為 Doctrine 成立公司後的第一位員工。
Category: embedded
Posts
micro 2440 遠端rs232 控制
想法: 一般使用rs232 over ip 的硬體都不便宜,此次想法將micro 2440版子上的com 1 可以以網路連接方式使用. 而且依照arm 2440這棵c
Posts
micro 2440 開箱 & Embedded Linux 初見面
micro 2440 簡介:(官網簡介) 如圖為 Micro2440 核心板佈局圖,它採用6 層板設計,並使用等長布線以滿足信號完 整性要求。從調試開發和方便維修的角度,我們把主要芯片
Category: freebsd
Posts
Phabricator 安裝
[
][1]
Phabricator 是 FasceBook 所開發出來的開源軟體 web applications,包含各種專案程式碼控管需要的功能 Review Code,Track Bugs,Browse Source…
接下來開始安裝,本文範例接來自官網使用手冊.
][1]
Phabricator 是 FasceBook 所開發出來的開源軟體 web applications,包含各種專案程式碼控管需要的功能 Review Code,Track Bugs,Browse Source…
接下來開始安裝,本文範例接來自官網使用手冊.
Posts
FreeBSD 安裝Gitlab 4.1
GitLab
![]() GitLab 是一套webbase的管理系統,與有名的github 非常類似.
GitLab 是一套webbase的管理系統,與有名的github 非常類似.
特性 快速, 安全與穩定的方案使用 Rails & Gitolite開發,並且使用MIT License授權.
如果這樣還沒有概念那就看看官網的 screenshots.
再來看怎摸安裝…
FreeBSD官網不支援,觀玩建議安裝使用Debian/Ubuntu 其他如RedHat linux bases都有人安裝成功過.
就是沒有FreeBSD!!!!!!!!!阿阿阿阿阿阿阿阿阿阿
Posts
FreeBsd 9.1 安裝遇到 Python not found!
如果你安裝遇到: Checking for Python support: ** Python not found! error: Python.h: No such file or directory 解決方式 就執行下列: cd /usr/ports/lang/python ; make install clean cp /usr/local/include/pth/* /usr/local/include/python2.7/
Posts
Redis Key-Value資料庫建置實測
reids
Redis是一個開源的使用ANSI C語言編寫、支援網路、可基於記憶體亦可持久化的日誌型、Key-Value資料庫,並提供多種語言的API。從2010年3月15日起,Redis的開發工作由VMware主持。
通常,Redis將數據存儲於記憶體,或被配置為使用虛擬記憶體。通過兩種方式可以實現數據持久:使用快照的方式,將內存中的數據不斷寫入磁碟;或使用類似MySQL的日誌方式,記錄每次更新的日誌。前者性能較高,但是可能會引起一定程度的數據遺失(後者相反)。
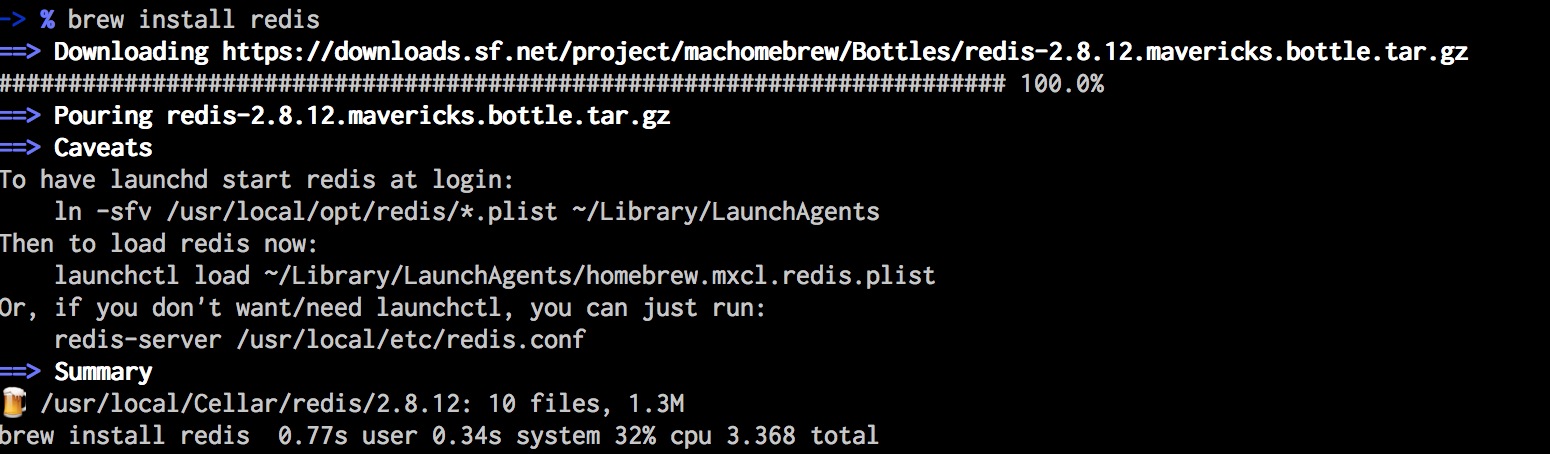
Mac 使用brew安裝reids
-> % brew install redis
==> Downloading http://redis.googlecode.com/files/redis-2.4.8.tar.gz
######################################################################## 100.0%
==> make -C src
==> Caveats
If this is your first install, automatically load on login with:
    mkdir -p ~/Library/LaunchAgents
    cp /usr/local/Cellar/redis/2.4.8/homebrew.mxcl.redis.plist ~/Library/LaunchAgents/
    launchctl load -w ~/Library/LaunchAgents/homebrew.mxcl.redis.plist

If this is an upgrade and you already have the homebrew.mxcl.redis.plist loaded:
    launchctl unload -w ~/Library/LaunchAgents/homebrew.mxcl.redis.plist
    cp /usr/local/Cellar/redis/2.4.8/homebrew.mxcl.redis.plist ~/Library/LaunchAgents/
    launchctl load -w ~/Library/LaunchAgents/homebrew.mxcl.redis.plist

  To start redis manually:
    redis-server /usr/local/etc/redis.conf

  To access the server:
    redis-cli
==> Summary
/usr/local/Cellar/redis/2.4.8: 9 files, 424K, built in 5 seconds
Posts
FreeBSD 9.0 架設安裝 redmine
之前有介紹過FreeBSD 架設 redmine.
不過現在因為版本關係不相容,以無法使用.
$ cd /usr/ports/www/redmine
$ make install clean
===>  redmine-1.3.1 is marked as broken: Does not work with RubyGems 1.8.
*** Error code 1

Stop in /usr/ports/www/redmine.
$
Posts
gitolite 安裝
FreeBSD gitolite 安裝
安裝:
# cd /usr/ports/devel/gitolite ; make install clean;
安裝結束最後面會看到以下提示:
==============================================================================

Final gitolite installation instructions:

Any ssh user can be a gitolite provider. Simply run the following command as
the user:

/usr/local/bin/gl-setup /path/to/admin.ssh.key.pub

This will setup up the configuration files for gitolite, designating where the
repositories are located and other options.

The admin ssh key allows full access to the gitolite-admin repository where
additional users and repositories can be configured.

By default, the git user is created for use by gitolite.

==============================================================================
===> Correct pkg-plist sequence to create group(s) and user(s)
===>   Registering installation for gitolite-2.1
===>  Cleaning for gitolite-2.1
Posts
Lua for PHP 安裝
主要安裝擴充套件資訊 LUA for PHP 使用 Plua 為安裝源. Linux 安裝方式: 先安裝好 lua: $apt-get install lua5.1 liblua5.1-0-dev 先下載並解開: $ cd /tmp $ wget http://plua.googlecode.com/files/plua-1.0.0.zip $ tar zxvf plua-1.0.0.zip $ cd plua $ phpize $ whereis php-config php-config: /usr/bin/php-config /usr/share/man/man1/php-config.1.gz $ rm -f
Posts
FreeBSD 架設 git Server
安裝: #cd /usr/ports/devel/git; make install clean ------------------------------------------------------------------------ *************************** GITWEB ************************************* If you installed the GITWEB option please follow these instructions: In the directory /usr/local/share/examples/git/gitweb you can find all files to make gitweb work as a public repository on the web. All you have to do to make gitweb work is: 1) Copy the files /usr/local/share/examples/git/gitweb/* to a directory on your web server (e.g. Apache2) in which you are
Posts
FreeBSD 8.2-RELEASE
Release Highlights
The highlights in the 8.2-RELEASE are the following:
[amd64] FreeBSD/amd64 now always sets the KVA space as equal to or larger than physical memory size. This change would help to prevent a “kmem_map too small” panic which often occurs when using ZFS.[r214620] The FreeBSD GENERIC kernel is now compiled with KDB and KDB_TRACE options. From 8.2-RELEASE the kernel supports displaying a stack trace on panic by using stack(9) facility with no debugger backend like ddb(8).
Posts
Ntop FreeBSD
#cd /usr/ports/net/ntop/ #make install clean ... ************************************************************ ************************************************************ WARNING: This install created a directory for the ntop files and databases: //usr/local/share/ntop This directory MUST be owned by the user which you are going to use to run ntop. The command you must issue is something like: chown -R ntop.ntop //usr/local/share/ntop or chown -R ntop:users //usr/local/share/ntop man chown to check the syntax for YOUR system ************************************************************ ************************************************************ # ntop -A Wed Feb 9 16:55:29 2011 NOTE: Interface merge enabled by default Wed Feb 9 16:55:29 2011 Initializing gdbm databases ntop startup - waiting for user response!
Posts
VirtualBox-OSE on FrreeBSD 免x11
參考 http://d.hatena.ne.jp/wittro/20100617/1276782079 cd /usr/src make build32 install32; ldconfig -v -m -R /usr/lib32 cd /usr/ports/emulators/virtualbox-ose make install clean ============================================================================= VirtualBox was installed. You need to load the vboxdrv kernel module via /boot/loader.conf: vboxdrv_load="YES" For bridged networking please add the following line to your /etc/rc.conf: vboxnet_enable="YES" Reboot the machine to load the needed kernel modules. You also have to add all users to your vboxusers group in order to use vbox.
Posts
FreeBSD 上使用 wkhtmltopdf 做網頁擷取
以往要用程式控制將網頁輸出pdf或擷取網頁,都是件浩大工程.
這次介紹如何在FreeBSD 命令列模式下即可輕易辦到,並且不需龐大的X Windows 圖形系統適合在server上跑.
以下是軟體原文介紹.
wkhtmltopdf
Convert html to pdf using webkit (qtwebkit)
Description
Simple shell utility to convert html to pdf using the webkit rendering engine, and qt.
Introduction
Searching the web, I have found several command line tools that allow you to convert a HTML-document to a PDF-document, however they all seem to use their own, and rather incomplete rendering engine, resulting in poor quality. Recently QT 4.4 was released with a WebKit widget (WebKit is the engine of Apples Safari, which is a fork of the KDE KHtml), and making a good tool became very easy.
此軟體使用WebKit開發完成,除了flash以外其他接可正常顯示!!(包含js)
在安裝前請先確定你的FreeBSD已安裝 linux-base 套件並正常使用,並且將port tree更新.
Posts
筆記 Haproxy 設定
Haproxy 設定筆記 global log 127.0.0.1 local0 log 127.0.0.1 local1 notice #log loghost local0 info maxconn 4096 #chroot /var/chroot/haproxy user haproxy group haproxy daemon #debug #quiet nbproc 2 # Number of processes defaults log global mode http option httplog option dontlognull retries 3 option redispatch maxconn 2000 contimeout 5000 clitimeout 30000 srvtimeout 50000 monitor-uri /ok.html stats uri /stats stats auth admin:admin listen load_balanced_http :80 mode http option httpchk
Posts
FreeBSD NGINX + PHP5
先去官網找到freebsd專用的port http://php-fpm.org/downloads/freebsd-port/ # fetch http://php-fpm.org/downloads/php-5.2.10-fpm-0.5.13.diff.gz # mv php-5.2.10-fpm-0.5.13.diff.gz /usr/ports/distfiles/ # fetch http://files.directadmin.com/services/custombuild/php-5.2.9-mail-header.patch # mv php-5.2.9-mail-header.patch /usr/ports/distfiles/ # fetch http://php-fpm.org/downloads/freebsd-port/php-5.2.10-fpm-0.5.13.tar.gz php-5.2.10-fpm-0.5.13.tar.gz 100% of 9503 B 45 kBps # tar zxvf php-5.2.10-fpm-0.5.13.tar.gz -C /usr/ports/lang x php5-fpm/ x php5-fpm/files/ x php5-fpm/Makefile x php5-fpm/distinfo x php5-fpm/pkg-descr x php5-fpm/pkg-plist x php5-fpm/files/php-fpm.sh.in x php5-fpm/files/patch-scripts::phpize.in x php5-fpm/files/patch-TSRM_threads.m4 x
Posts
學習 FreeBSD ports
安裝 cd /usr/ports/ports-mgmt/porttools ; make install clean 簡介 FreeBSD Port Tools includes the following commands: - port create: create a new port from a template - port diff: generate a diff against a previous version of the port - port fetch: fetch distfile(s) of a new version of the port - port help: display usage summary for port(1) commands - port submit: submit a PR with new port,
Posts
QEMU on FreeBSD 8.0 再你的的server上,建立自己的虛擬電腦 lab 以供測試開發.
一直以來你是否有跟我有相同的困擾? 手頭上只有一台機器,效能尚可系統負載不高.
但工作需要執行多種環境測試實驗,無法隨身攜帶各種系統. 等等困境….
一般的虛擬機器軟體又需要圖型介面,才可設定使用.(這無疑對系統又是一種負擔,與當機危險)
現在終於有實際解決方案~所需費用 0.
Posts
跨平台效能TEST
http://www.primatelabs.ca/geekbench/ 支援很多喔 Geekbench 2.1.2 for Mac OS X Geekbench 2.1.2 for Windows Geekbench 2.1.2 for Linux Geekbench 2.0.9 for Solaris 64Bit 要註冊
Posts
紀錄 FreeBSD make.conf
MASTER_SITE_BACKUP?= \ ftp://ftp.tw.freebsd.org/pub/FreeBSD/distfiles/${DIST_SUBDIR}/ ftp://ftp2.tw.freebsd.org/pub/FreeBSD/distfiles/${DIST_SUBDIR}/ ftp://ftp3.tw.freebsd.org/pub/FreeBSD/distfiles/${DIST_SUBDIR}/ ftp://ftp4.tw.freebsd.org/pub/FreeBSD/distfiles/${DIST_SUBDIR}/ ftp://ftp5.tw.freebsd.org/pub/FreeBSD/distfiles/${DIST_SUBDIR}/ ftp://ftp7.tw.freebsd.org/pub/FreeBSD/distfiles/${DIST_SUBDIR}/ ftp://ftp8.tw.freebsd.org/pub/FreeBSD/distfiles/${DIST_SUBDIR}/ ftp://ftp9.tw.freebsd.org/pub/FreeBSD/distfiles/${DIST_SUBDIR}/ MASTER_SITE_OVERRIDE?= ${MASTER_SITE_BACKUP} MASTER_SORT_REGEX= .tw/ .tw. .edu/ .edu. FETCH_CMD=fetch -U -A -P WITHOUT_X11=yes MACHINE=amd64 MACHINE_ARCH=amd64 MAKE_JOBS_NUMBER=3 WITH_LIB32=yes <~~~這個才會有32的LIB # for cvsup make update SUP_UPDATE=yes SUP= /usr/bin/csup SUPFLAGS= -g -L 2 SUPHOST= cvsup2.tw.FreeBSD.org SUPFILE= /usr/share/examples/cvsup/standard-supfile PORTSSUPFILE= /usr/share/examples/cvsup/ports-supfile DOCSUPFILE= /usr/share/examples/cvsup/doc-supfile
Posts
apache2 限流模組 mod_cband 說明文件
Source:http://codee.pl/cband_documentation.html Configuration Configuration is very simple, you must write only several lines. First, you must add the following command to the main config file to load the mod_cband module: LoadModule cband_module modules/mod_cband.so Configuration Directives New commands from 0.9.7.0 version: CBandDefaultExceededCode – the http code sent to the user when the quota is exceeded Units accepted in various directives: transfer speeds: kbps, Mbps, Gbps – multiples of “bits per second”, respectively:
Posts
DELL PERC 6/i on FreeBSD
此快raid卡為Lsi 代工 基本上差不多的’效能’ Lsi的raid 在6.1版後 全面進化 核心支援 sata sas 用起來粉快樂 以下裝置
Posts
FreeBSD PHP4 PHP5 APACHE1 APACHE22 共存
說明現在公司因為支前專案採用PHP4 APACHE1.3 要轉換到PHP5 APACHE22 其中又不使服務中斷 只好再一台系統上同時安裝兩種 以下只說明 另外安裝的PHP5 APACHE22 安裝ap
Posts
Freebsd 安裝 iftop
引用來源 https://blog.shian.tw/iftop.html/trackback 安裝: cd /usr/ports/net-mgmt/iftop make install clean 使用: # iftop -i eth0 參數說明: -i: 監控網路卡介面 -B: 以bytes為單位 -n: 以IP顯示不用DNS反解 -N: 只顯示port不顯示服務名
Posts
Apache DDOS mod_evasive20設定檔
LoadModule evasive20_module modules/mod_evasive20.so DOSHashTableSize 3097 # 記錄黑名單的尺寸 DOSPageCount 2 # 每個頁面被判斷為dos攻擊的讀取次數 DOSSiteCount 50 # 每個站點被判斷為dos攻擊的讀取部件(object)的個數 DOSPageInterval 1 #
Posts
php execl dde
<?<br /> $excel =new COM(“Excel.Application”)or die(“Unable to instanciate Excel”);<br /> print “Loaded excel,version {$excel->Version}n”;<br /> $excel->Visible =0;<br /> $book=$excel->Workbooks->open(“c://dde.xls”);<br /> $sheet=$book->Worksheets(“Sheet1”);<br /> $a=$excel->DDEInitiate(“Excel”,“c://dde.xls”);<br /> $c =$excel->DDEExecute($a,“A1:D1”);<br /> <span style=“display: none;“>(http://www.GetJetso.com - 著數網)</span> $Range=$sheet->Range(“A1:D1”);<br /> $cell=$Range->Cells(1,4);<br /> echo $cell->value;<br /> $excel->DDETerminate($a);<br /> $excel->Workbooks->Close();<br /> unset($excel);<br /> unset($a);<br /> ?>
Posts
Apache的rewrite的重寫相關的參數
Apache mod_rewrite規則重寫的標誌一覽 R[=code](force redirect) 強制外部重定向 強制在替代字符串加上http://thishost[:thisport]/前綴重
Posts
筆記 有用的RC.CONF
sshd_enable=”YES” syslogd_enable=”YES” syslogd_flags=”-ss” # 註:-s 是啟用安全模式,不記錄遠端傳送過來的 log # 如果 -ss 是關閉 port,而且也禁止將 log 傳送到遠端的電腦。 sendmail_enable=”NO” # 註:NO 是僅提供 localhost 的 mail 功能
Posts
FreeBSD 7.0-RELEASE了
引用http://www.freebsd.org/releases/7.0R/announce.html Date: Wed, 27 Feb 2008 17:19:52 -0500 From: Ken Smith kensmith@FreeBSD.org To: freebsd-announce@FreeBSD.org Subject: [FreeBSD-Announce] FreeBSD 7.0-RELEASE Available
Posts
rrdtool create 網路圖表檔案
rrdtool create test.rrd -s 300 DS:if02:COUNTER:600:U:U \ DS:if03:COUNTER:600:U:U \ DS:if04:COUNTER:600:U:U \ DS:if05:COUNTER:600:U:U \ DS:if06:COUNTER:600:U:U \ DS:if07:COUNTER:600:U:U \ DS:if08:COUNTER:600:U:U \ DS:if09:COUNTER:600:U:U \ DS:if10:COUNTER:600:U:U \ DS:if11:COUNTER:600:U:U \ DS:if12:COUNTER:600:U:U \ DS:if13:COUNTER:600:U:U \ DS:if14:COUNTER:600:U:U \ DS:if15:COUNTER:600:U:U \ DS:if16:COUNTER:600:U:U \ DS:if17:COUNTER:600:U:U \ DS:if18:COUNTER:600:U:U \ DS:if19:COUNTER:600:U:U \ DS:if20:COUNTER:600:U:U \ DS:if21:COUNTER:600:U:U \ DS:if22:COUNTER:600:U:U \ DS:if23:COUNTER:600:U:U \ DS:if24:COUNTER:600:U:U \ DS:if25:COUNTER:600:U:U \ DS:if26:COUNTER:600:U:U \ DS:if27:COUNTER:600:U:U \ DS:if28:COUNTER:600:U:U \ DS:if29:COUNTER:600:U:U \ DS:if30:COUNTER:600:U:U \ DS:if31:COUNTER:600:U:U \ DS:if32:COUNTER:600:U:U \ DS:if33:COUNTER:600:U:U \ DS:if34:COUNTER:600:U:U
Posts
rrdtool 實作6台主機 LOADING 繪圖
rrdtool graph test.png \ –start=-86400 \ –end=-300 \ –base=1000 \ –title “大安 UBR CPU負載” \ –height=120 \ –alt-autoscale-max \ –lower-limit=0 \ –slope-mode \ -n TITLE:12:/usr/share/fonts/truetype/bsmi00lp.ttf \ –font DEFAULT:0:/usr/share/fonts/truetype/bsmi00lp.ttf \ DEF:c1=$rrd_data:c1:AVERAGE \ DEF:c2=$rrd_data:c2:AVERAGE \ DEF:c3=$rrd_data:c3:AVERAGE \ DEF:c4=$rrd_data:c4:AVERAGE \ DEF:c5=$rrd_data:c5:AVERAGE \ DEF:c6=$rrd_data:c6:AVERAGE \ COMMENT:&#
Posts
RRDtool
為 MRTG 進階版,原 MRTG 作者覺得 MRTG 有缺點(例如無法一個流量圖集合所有相關要統計的數據)所以便又著手開發 RRDTool,RRDTool 一樣是利用 SNMP 協定
Posts
ajax跟蹤文件上傳進度條
(文件來源 http://www.ibm.com/developerworks/cn/opensource/os-php-v525/index.html) 2007 年 6 月 08 日 PHP V5.2 為開發人員添加了 hook 以利用實時跟蹤文件上傳進度的功能。本文是 系列文章(共五部分)的第 5 部分,將向您展示如何監視文件
Posts
利用imagemagick來作縮圖
<?php $w=”240″; //自行設定的縮圖寬度 $h=”320″; //自行設定的縮圖高度 if($_FILES[‘file’][‘type’]==”image/pjpeg” || $_FILES[‘file’][‘type’]==”image/gif” || $_FILES[‘file’][‘type’]==”image/png”) { if($_FILES[‘file’][‘type’]==”image/pjpeg”) { $filename=substr(rand(0,999999999999),1,7).”.gif”; //隨機取檔名..我的習慣啦 ^^|| } if($_FILES[‘file’][‘type’]==”image/gif”) { $filename=substr(rand(0,999999999999),1,7).”.gif”; } if($_FILES[‘file’][‘type’]==”image/png”) { $filename=substr(rand(0,999999999999),1,7).”.png”; } $size=$w.”x”.$h; copy($_FILES[‘file’][‘tmp_name’],”/home/caisse/case/kf/data/file/b”.$filename); //將暫存檔copy
Posts
Freebsd 6.2 stable 之路
安裝好 FreeBSD 6.2-RELEASE 確認CVSUP 安裝好如沒有到/usr/ports/net/cvsup-without-gui 去 make install clean cd /usr/share/examples/cvsup/ 將 stable-supfile ports-supfile 2個檔案 cp 到 /usr 更改內
Posts
webalizer 分析多網站記錄 note
There are many ways to process multiple virtual hosts on the same machine. The easiest way I have found, provided that each host generates it’s own log file, is as follows: ** ** Create a central directory for your configuration files. (I use /etc/webalizer) Make a configuration file for each virtual host and place them in the central directory. Each configuration file should have at least the HostName (domain), OutputDir
Posts
Link Aggregation on FreeBSD多網卡合併 頻寬
(忘了當初引用的網址) 在研究所的時候就玩過在 FreeBSD 底下用多張網路卡跟 Switch 做 Link Aggregation,最近又有機會碰到,趁這個機會在這邊寫個 Note
Posts
Portsnap 方式 更新porttree
Portsnap 方式 portsnap(8) 也是更新 Ports Collection 的方式之一。 FreeBSD 6.0 起開始內建 Portsnap 機制,而較舊的系統,則可透過 sysutils/portsnap port 來安裝: # pkg_add -r portsnap Portsnap 細節功能,請參閱 Portsnap 使用篇。 若 /usr/ports 目錄不存在的
Posts
印表機的安裝 on FreeBSD
(忘了引用頁面) 自前幾個月開始使用 FreeBSD 來當 Desktop 後,一直搞不定印表機的部份,因為一直弄不懂 filer 的部份,今天總算是搞定了,心情之愉悅真是筆墨無法形容,
Posts
color ls 彩色世界
cd /usr/ports/misc/gnuls make all install clean 再用gnuls取代ls, 像我用tcsh, 所以在~/.tcshrc加入 alias ls ‘gnuls –color=auto –show-control-chars’ 如果是使用bash者,則可修改/etc/profi
Posts
非mmcache!Memcached的應用:多網站伺服器 PHP 共享 Session
請注意是 Memcached 不是 mmcache,很多人搞不清楚他們兩個的不同!多半玩過 PHP 的人大概都聽過 mmcache,它是一個預編譯緩衝的 PHP 加速程式,能夠提升
Posts
AWStats 6.3 網站分析 簡易安裝與設定
(忘了當初引用的網址) 使用 PORTS 安裝 cd /usr/ports/www/awstats/ make install AWStats 安裝至 /usr/local/www/awstats/ ====================================================================== 基本資料: 網站位址:www.lab.mlc.edu.tw ====================================================================== 建立 AWStats 設定檔(檔名和你的網站名
Posts
安裝MRTG 主機流量分析
SNMP Simple Network Management Protocol 使用 PORTS 安裝: cd /usr/ports/net-mgmt/net-snmp ; make install ; rehash 設定 /etc/rc.conf 加入下列設定內容: snmpd_enable=”YES” snmpd_flags=”-p /var/run/snmpd.pid” /etc/hosts.allow 在第一行加入下列設定內容: snmpd : localhost : allow /usr/local/share/snmp/snmpd.conf 新建此檔案,內容如下: rocommunity mrtgmgr syslocation FreeBSD syscontact Maintainer
Posts
FreeBSD 安裝nvidia-driver顯卡驅動程式
/usr/ports/x11/nvidia-driver make install To use these drivers, make sure that you have loaded the nvidia kernel module, by doing # kldload nvidia or adding nvidia_load=”YES” to your /boot/loader.conf
Posts
SSH-keygen SSH加密KEY
/usr/bin/ssh-keygen -t rsa1 -b 1024 -f /etc/ssh/ssh_host_key /usr/bin/ssh-keygen -t dsa -f /etc/ssh/ssh_host_dsa_key /usr/bin/ssh-keygen -t rsa -f /etc/ssh/ssh_host_rsa_key
Posts
freebsd 6.1 amd64(64bit) 安裝筆記
選擇 Taiwan default Express 磁碟重整 D 刪除 A 用整顆 Q 結束 BootMgr ->A 自動分配 swap 記憶體2倍大 / 512mb /tmp 512mb /usr 4096mb /var 剩下的 Q 結束 ———————————————- Choose Distributions ———————————————- 選擇 Developer Kern-Developer User ———————————————- Choose Installation Media ———————————————- CD/DVD ———————————————- User Confirmation Requested ———————————————- 選擇 yes RootPassword 輸
Posts
FreeBSD 6.1安裝筆記
選擇 Taiwan default Express 磁碟重整 D 刪除 A 用整顆 Q 結束 BootMgr ->A 自動分配 swap 記憶體2倍大 / 512mb /tmp 512mb /usr 4096mb /var 剩下的 Q 結束 ———————————————- Choose Distributions ———————————————- 選擇 Developer Kern-Developer User ———————————————- Choose Installation Media ———————————————- CD/DVD ———————————————- User Confirmation Requested ———————————————- 選擇 yes RootPassword 輸
Posts
FreeBSD 使用PHP 透過FTP連線拋檔 備份
<?php define(“FTP_TIMEOUT”,90); // FTP Statuscodes define(“FTP_COMMAND_OK”,200); define(“FTP_FILE_ACTION_OK”,250); define(“FTP_FILE_TRANSFER_OK”,226); define(“FTP_COMMAND_NOT_IMPLEMENTED”,502); define(“FTP_FILE_STATUS”,213); define(“FTP_NAME_SYSTEM_TYPE”,215); define(“FTP_PASSIVE_MODE”,227); define(“FTP_PATHNAME”,257); define(“FTP_SERVICE_READY”,220); define(“FTP_USER_LOGGED_IN”,230); define(“FTP_PASSWORD_NEEDED”,331); define(“FTP_USER_NOT_LOGGED_IN”,530); if (!defined(“FTP_ASCII”)) define(“FTP_ASCII”,0); if (!defined(“FTP_BINARY”)) define(“FTP_BINARY”,1); class FTP { var $passiveMode = TRUE; var $lastLines = array(); var $lastLine = “”; var $controlSocket = NULL; var $newResult = FALSE; var $lastResult = -1; var $pasvAddr = NULL; var $error_no = NULL; var $error_msg = NULL; function FTP() { } function connect($host, $port=21, $timeout=FTP_TIMEOUT)
Posts
一個小巧的程式(於英文console顯示BIG5文件)
一個小巧的程式(於英文console顯示BIG5文件) 作者 mison 在純英文的 text console 之下,既不跑 X-win、也不跑 jmcce,但是 偶爾需要看一份BIG
Posts
FreeBsd上使用bt
mldonkey 是一套免費的 e-Donkey 用戶端 http://freebsd.sinica.edu.tw/zh-tut/mldonkey.html mldonkey 是一套免費的 e-Donkey 用戶端。 不過在文字介面的搜尋有點簡陋,筆者通常都是利用網頁介面來存取, 也有 GTK 圖形介面。 # cd /usr/ports/net/mldonkey # make WITHOUT_TK=yes WITHOUT_X11=yes
Posts
Apache2.1.4 重新啟動時出現httpready
Apache2.1.4 重新啟動時出現httpready 解決的方法: 在你的 /boot/loader.conf 加入一行 accf_http_load=”yes”
Category: git
Posts
Phabricator 安裝
[
][1]
Phabricator 是 FasceBook 所開發出來的開源軟體 web applications,包含各種專案程式碼控管需要的功能 Review Code,Track Bugs,Browse Source…
接下來開始安裝,本文範例接來自官網使用手冊.
][1]
Phabricator 是 FasceBook 所開發出來的開源軟體 web applications,包含各種專案程式碼控管需要的功能 Review Code,Track Bugs,Browse Source…
接下來開始安裝,本文範例接來自官網使用手冊.
Posts
Git 與遠端Server 應用
乘上篇文章gitolite 安裝.
當你開心使用git一陣子,又在網路上免費或付費支援git平台的版本控管後是否發覺….
真的好麻煩每次都要同步好幾台SERVER上面的repositories…
有沒有在push上server後自動幫你搞定呢?!
Posts
gitolite 安裝
FreeBSD gitolite 安裝
安裝:
# cd /usr/ports/devel/gitolite ; make install clean;
安裝結束最後面會看到以下提示:
==============================================================================

Final gitolite installation instructions:

Any ssh user can be a gitolite provider. Simply run the following command as
the user:

/usr/local/bin/gl-setup /path/to/admin.ssh.key.pub

This will setup up the configuration files for gitolite, designating where the
repositories are located and other options.

The admin ssh key allows full access to the gitolite-admin repository where
additional users and repositories can be configured.

By default, the git user is created for use by gitolite.

==============================================================================
===> Correct pkg-plist sequence to create group(s) and user(s)
===>   Registering installation for gitolite-2.1
===>  Cleaning for gitolite-2.1
Category: go
Posts
Go 語言~ 初學筆記
主要學習文件依照下面的連結閱讀 https://github.com/astaxie/build-web-application-with-golang 首先安裝Go,Go也有第三方套件做版本切換gvm. https://github.com/moovweb/gvm 依照只是裝好後. $ gvm install go1 Downloading Go source... Installing go1... * Compiling... $ gvm use go1 Now using version go1 $
Category: iot
Posts
制霸 IoT 30Day! Day 30總結
心得 物聯網(IoT)雖然近年有不錯成長,但是卻沒有很好的應用導致遲滯! 關於因該有幾樣因由: 資料無用: 物聯網(IoT)裝置成長,資料成長客戶也
Posts
制霸 IoT 30Day! Day 29 AIoT介紹
AIoT 介紹 AIoT 由來就是 人工智慧(AI) + 物聯網(IoT)的組合。隨著人工智慧(AI)技術的更多突破,物聯網(IoT)萬物相聯的蓬勃發展,兩者也匯流
Posts
制霸 IoT 30Day! Day 28 Alexa語音服務開發介紹
語音服務開發介紹 今天要來介紹 IoT 應智慧家庭最直覺的應用,語音服務以目前較為大型廠商服務做介紹。 Amazon Alexa 語音開發服務介紹 亞馬遜所開發的 Alexa 之所以火紅是
Posts
制霸 IoT 30Day! Day 27 Mesh Network網狀網路
Mesh Network 網狀網路 介紹 今天要來介紹因應 IoT 發展,相關網路產品日新月異!那網路是一個重要環節,當居家使用情況變得一樓打不上三樓此時該如何是好? 那 Mesh Network 網
Posts
制霸 IoT 30Day! Day 26 LoRaWAN 開發介紹
LoRaWAN 開發介紹 前面我們介紹了 wifi 與藍芽今天來介紹使用 ESP32 開發 LoRaWAN 硬體介紹 今天介紹的是使用 Heltec WiFi LoRa 32 (V2)。 微處理器:ESP32 (雙核 32 位 MCU + ULP 內核),
Posts
制霸 IoT 30Day! Day 25 資料應用
IoT 資料應用 我們今天要探討的是,當我們開始有了資料 IoT 如何做有效利用。 資料應用 Grafana 與 telegram 應用 我們這邊介紹如何在我們用的 Grafana 圖表系統內好好利用收集到的資
Posts
制霸 IoT 30Day! Day 24 實際案例 空氣盒子專案(三)
空氣盒子說明 今天來介紹這個空氣盒子專案,細部運作原理。 程式碼介紹 我們這理用到很多模組是 UART 通訊介面,但是實際硬體上只有一個 UART 介面。 那我們這邊使
Posts
制霸 IoT 30Day! Day 23 實際案例 空氣盒子專案(二)
空氣盒子首版 今天來介紹這個空氣盒子專案,所有元件與運作實際介紹。 硬體 HTU21D 溫濕度感測器 基於高性能的濕度感應元件製成,新一代 HTU21D 溫度和濕度傳感器在尺
Posts
制霸 IoT 30Day! Day 22 實際案例 空氣盒子專案(一)
空氣盒子專案緣由 約莫 2016 年 03 月 22 號 看到新聞介紹台北智慧城市空氣盒子啟動記者會發現起有趣的議題 『空氣污染』! 約莫十多年前我從台北移居台中工作生活
Posts
制霸 IoT 30Day! Day 21 藍芽硬體連結
藍芽硬體連結 上一篇我們介紹硬體的藍芽開發介紹,今天介紹與其他藍芽做資料讀取。 ESP32 藍芽 scan 直接上代碼,各位可以看到並不會太多複雜的。 #include <Arduino.h> #include <BLEDevice.h> #include <BLEUtils.h> #include
Posts
制霸 IoT 30Day! Day 20 藍芽硬體開發
藍芽硬體開發 上一篇我們介紹的部分是以藍芽模組作為開發使用,今天要來介紹硬體的藍芽開發介紹。 ESP32 藍芽開發與使用 ESP32 是一款支援 Wifi 與藍芽的開發單晶片採
Posts
制霸 IoT 30Day! Day 19 藍芽資料發送接收
藍芽 資料發送與接收 今天介紹我們硬體在沒有藍芽時,如何透過藍芽模組發送接收資料。 藍芽 MLT-BT05 今天介紹 MLT-BT05 一個 BLE4.0 藍芽模組採用 TI CC2541 晶片,配置 256Kb 空間,支援 AT
Posts
制霸 IoT 30Day! Day 18 藍芽溫濕度計使用
藍芽 溫濕度計 今天介紹一下比較生活篇的應用藍芽 溫濕度計的資料收集與呈現。 米家藍牙溫濕度計 今天登場的是小米的米家藍牙溫濕度計 米家藍牙溫濕度計 產品
Posts
制霸 IoT 30Day! Day 17 藍芽偵測使用
藍芽 Bluetooth 今天介紹一下藍芽 Bluetooth 目前大多的裝置採用的藍牙標準(Bluetooth 4.0 以上)所有標準由藍牙技術聯盟(Bluetooth SIG),特色就是
Posts
制霸 IoT 30Day! Day 16 圖表(二)
圖表資料 今天介紹有了儀表板平台,那所儲存資料因該如何存?除了一般 MySQL,Microsoft SQL Server,PostgreSQL 之外。 InfluxDB InfluxDB InfluxDB是一個由 InfluxData 開發的開源時序型資料庫 time series database (TS
Posts
制霸 IoT 30Day! Day 15 圖表(一)
圖表 今天介紹開始介紹當我們有了資料如何自行架設儀表板平台!? Grafana Grafana 是一個開源的分析與監控解決方案支援很多資料來源。 Grafana Grafana 具備豐富的面板選擇,除了
Posts
制霸 IoT 30Day! Day 14 硬體與MQTT使用連結
MQTT 使用與連結 今天介紹 硬體的 MQTT 使用與連結實際操作部分,會有較多程式碼。 安裝程式庫 一般來說安裝的程式庫會介紹找Adafruit MQTT這種通用性
Posts
制霸 IoT 30Day! Day 13 MQTT使用與連結
MQTT 使用與連結 今天介紹 MQTT 使用與連結實際操作部分,前一篇有介紹了 MQTT 各種特性與特點。 MQTT Broker MQTT Borker 先介紹一下因為沒有他我們也沒得用。 MQTT 軟體比對表 下表提到
Posts
制霸 IoT 30Day! Day 12 MQTT介紹
MQTT 介紹
昨天介紹基本的雲端連結方式非常基本,今天來介紹真正因應 IoT 而生的 MQTT(Message Queuing Telemetry Transport).
起源
MQTT 消息隊列遙測傳輸(Message Queuing Telemetry Transport)是 ISO 標準(ISO/IEC PRF 20922)下基於發布/訂閱範式的消息協議。它工作在 TCP/IP 協議族上,是為硬體性能低下的遠程設備以及網絡狀況糟糕的情況下而設計的發布/訂閱型消息協議,為此,它需要一個消息中間件 。 為何說是硬體性能低下,因為應用場景在 IoT 的應用需要考慮在低耗電長時間待命的狀態下在短時間內完成資料傳送過程。 以及網絡狀況糟糕,因為地處偏遠訊號複雜狀態下會做訊息傳送與接收的確認。
Posts
制霸 IoT 30Day! Day 11 硬體開發介紹(二)
硬體開發介紹(二)
上一篇介紹硬體的溫斯度讀取,看是沒有相關其實今天要來介紹真正上雲端的部分!實際把家裡的溫度濕度傳送到雲端。
Posts
制霸 IoT 30Day! Day 10 硬體開發介紹(一)
硬體開發介紹(一)
前幾天介紹一些開發工具現在使用 PlatformIO 來開發,現在進入正式開發先從小東西開始!溫度。這邊就紹如何取的溫度,依照手邊材料目前有 AHT10。
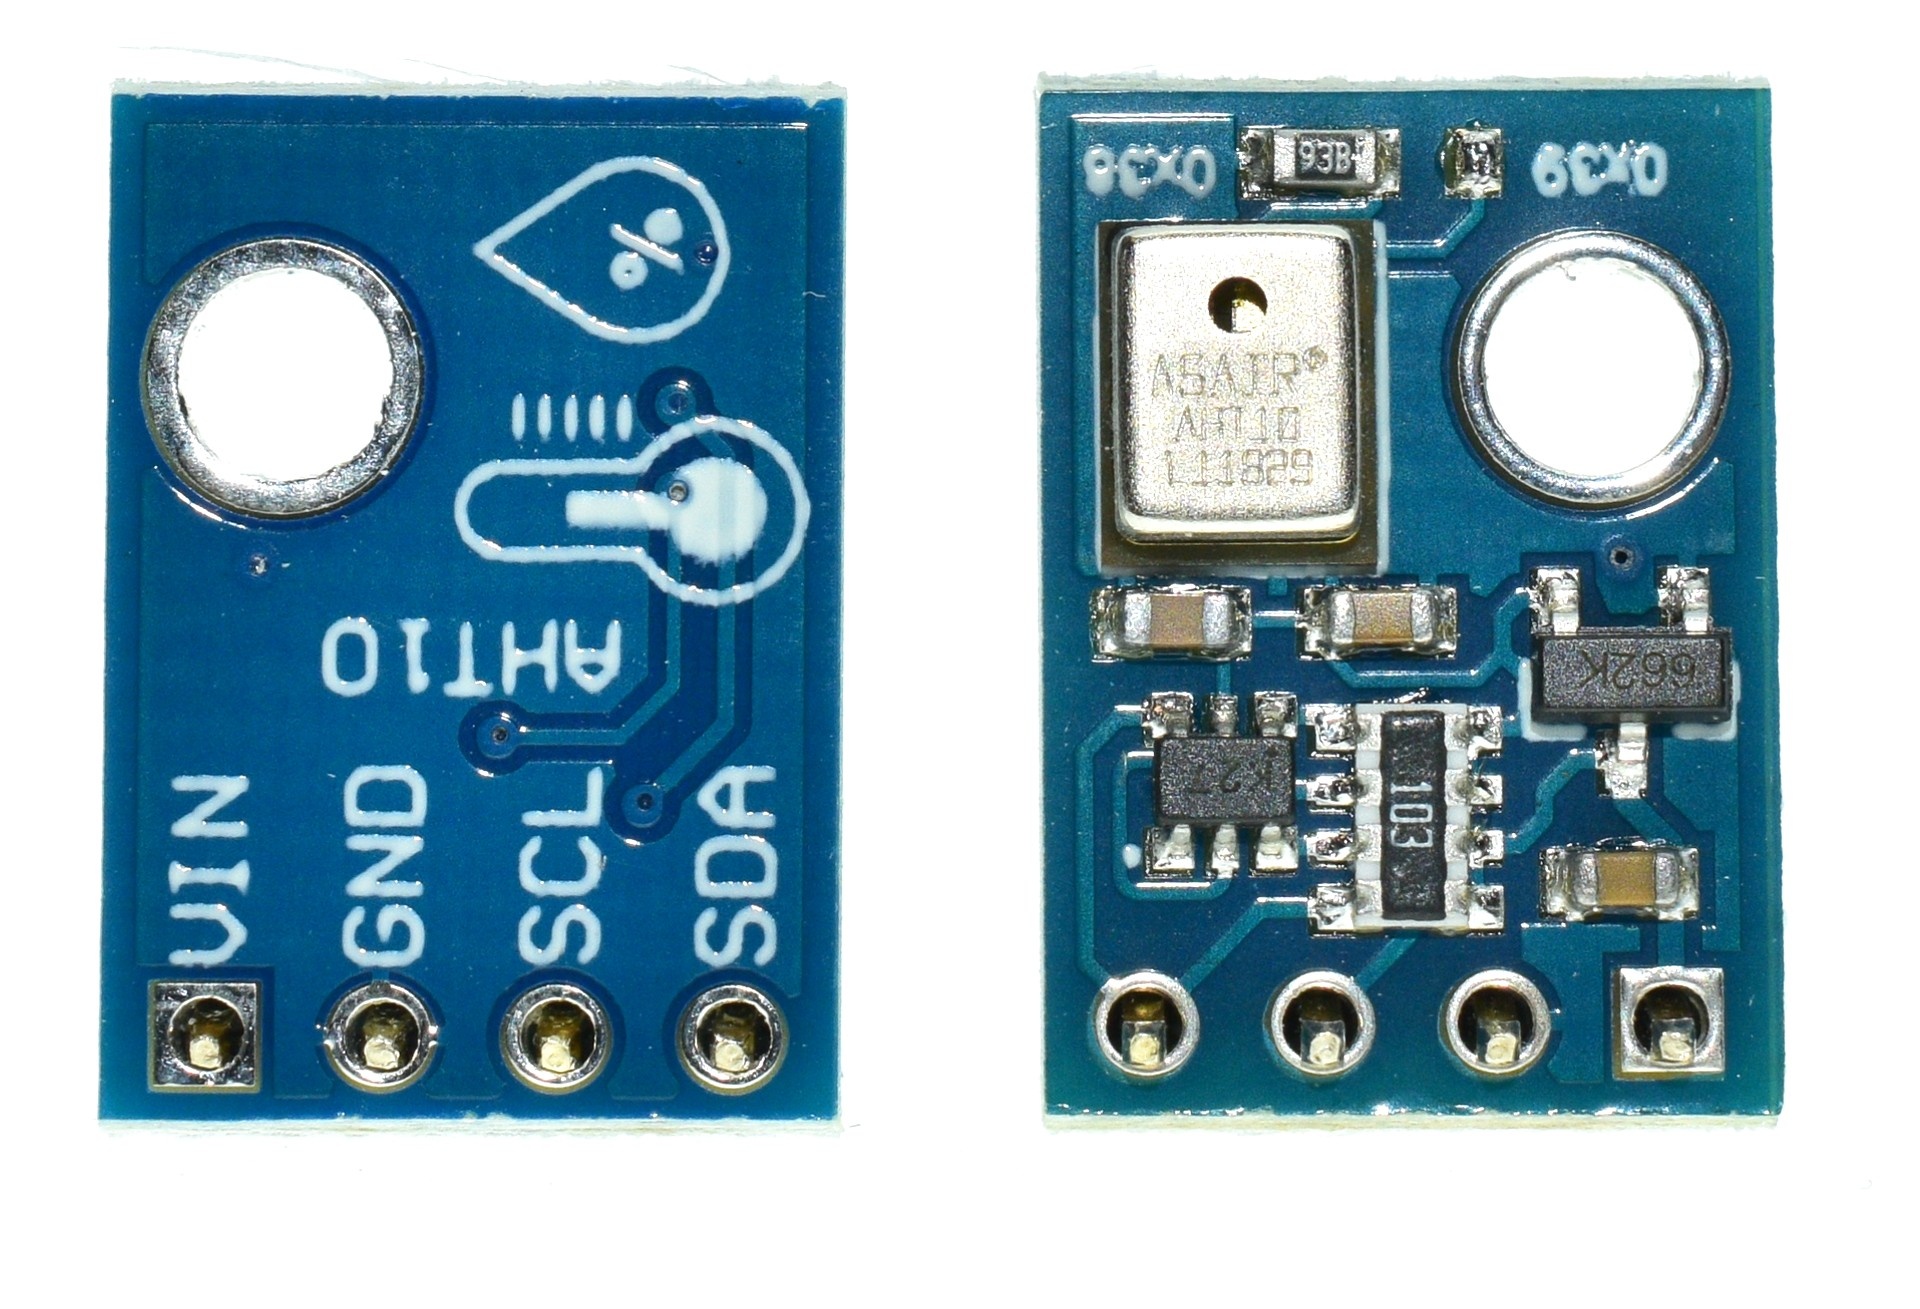
AHT10
Posts
制霸 IoT 30Day! Day 09 開發工具介紹(二)
開發工具介紹(二)
昨天介開發工具 Windows, Linux, MacOSX 都可以使用的 Arduino 工具。介面簡單操作直覺但是其實還是很多不便利的,程式編輯器部分沒有很聰明易用,今天介紹另一款整合在編輯器的開發工具。
PlatformIO
PlatformIO 是一個開源的 IoT 開發工具平台。包含跨平台開發,除錯,單元測試還有韌體上傳一應俱全。
![]()
PlatformIO logo
Posts
制霸 IoT 30Day! Day 08 開發工具介紹(一)
開發工具介紹(一)
前幾天一直都在介紹相關知識與論述,現在進入開發階段會介紹幾個基本開放源碼的免付費工具。一般來說都是跨平台的開發工具 Windows, Linux, MacOSX 都可以使用唷。
Arduino Software IDE
首先介紹最具知名的Arduino專案始於 2003 年,作為義大利伊夫雷亞地區伊夫雷亞互動設計研究所的學生專案,是一家製作開源硬體和開源軟體的公司。同時兼有專案和用戶社群,該公司負責設計和製造單板微控制器和微控制器套件,用於構建數位裝置和互動式物件,以便在物理和數位世界中感知和控制物件。該專案的產品是按照 GNU 寬通用公共許可證(LGPL)或 GNU 通用公共許可證(GPL)許可的開源硬體和軟體分發的,Arduino 允許任何人製造 Arduino 板和軟體分發。 Arduino 板可以以預裝的形式商業銷售,也可以作為 DIY 套件購買。
Posts
制霸 IoT 30Day! Day 07 平台 雲端服務介紹
平台 介紹
ARM® mbed™ IoT
Mbed 是 ARM 2009 年 9 月 21 日 所創立一個平台和作業系統,用於基於 32-bit ARM Cortex-M 微控制器的連接網際網路的裝置,這些裝置也叫做物聯網裝置。這個專案由 ARM 和它的技術夥伴共同作業開發。
現有各種針對 mbed 平台的硬體演示板,其首為最初的 mbed Microcontroller board。mbed 微控制器開發板(以「mbed NXP LPC1768」銷售)是基於 NXP 微控制器的演示板,它有一個 ARM Cortex M3 核心,執行於 96 MHz,帶有 512 KB flash,64 KB RAM,還有一些介面包括乙太網路、USB 裝置、CAN、SPI、I²C 和其他 I/O。mbed 微控制器在 2010 年收到了第一個獎項,年度 EDN 軟體/嵌入式工具類創新獎。
Posts
制霸 IoT 30Day! Day 06 2.4GHz 裝置介紹(二)
2.4GHz 裝置(二)
再來繼續介紹 2.4Ghz 的裝置 然後是 Bluetooth, ZigBee 這部分的裝置。這些有特點就是司要閘道去送資料到網際網路。或者就是區域型基地台直接做接收處理,像是手機與藍牙通訊手機統整資料再發送到雲端或客戶直接操作。
| 標題文字 | WIFI | Zigbee | 電力載波 | Bluetooth |
|---|---|---|---|---|
| 傳輸距離 | 100-300M | 50-300M | 500M | 1-10M |
| 傳輸速率 | 300Mbps | 250kbps | 500Mbps | 1Mbps |
| 功耗 | 10-50mA | 5mA | zigbee 和 WIFI 之間 | |
| 特點 | 應用最廣 | 可自組網,網路節點數最大可達 65000 個。 | 可基於電力線傳輸,無需布線。 |
回顧一下優各個重點
Posts
制霸 IoT 30Day! Day 05 2.4GHz 裝置介紹(一)
2.4GHz 裝置
再來介紹 2.4Ghz 的裝置,這部分 IoT 主要的是應用使用的頻譜區塊。因為是開放的共用區塊只有台灣還是得經過NCC認證才可販售,應用的傳輸很多種目前主要 WIFI, Bluetooth, ZigBee。
Posts
制霸 IoT 30Day! Day 04 IoT LPWAN介紹
LPWAN 低功率網路
這邊首先一開始先介紹 LPWAN(Low-Power Wide-Area Network,低功率廣域網路)也稱為 LPWA (Low-Power Wide-Area) 或 LPN(Low-Power Network,低功率網路),是一種用在物聯網(例如以電池為電源的感測器),可以用低比特率進行長距離通訊的無線網路。低電量需求、低比特率與使用時機可以用來區分 LPWAN 與無線廣域網路,無線廣域網路被設計來連接企業或用戶,可以傳輸更多資料但也更耗能。
Posts
制霸 IoT 30Day! Day 03 IoT 語音智慧裝置
IoT 語音智慧裝置 現在來談的是語音裝置,相信你會滿頭問號?語音裝置為何要談論語音裝置?因為在這個 IoT 爆炸年代 智慧家庭 中 引爆點是語音裝置! 有可能嗎?
Posts
制霸 IoT 30Day! Day 02 IoT 介紹
IoT 概論
IoT 技術(英語:Internet of Things,縮寫 IoT)是網際網路、傳統電信網等資訊承載體,讓所有能行使獨立功能的普通裝置實現互聯互通的網路。更廣泛定每個物件都可以透過網路通訊傳送資料或怎與其他裝置互動。原始構想一個人周圍大約含有一千至五千個裝置。所以在換算人口數量其中預期數量會很驚人大約會有一千兆以上裝置。
Posts
制霸IoT 30Day!Day 01
制霸 IoT 30Day! Day 01
動機
這是我第一次參加 IT 邦幫忙鐵人賽,老實說我也不知道我會不會完賽。以往經驗的要連續 30 天來產出文章來說,對於我這個文筆不好又不善於表達的人大約有 101 這樣高的障礙吧。 目前來說看到這塊領域 IoT 這邊算是百花齊放的時代,君不見台灣有專門課程或成熟的觀念來做的相關應用與學術探討。
Category: iphone-developer
Posts
iPhone SDK 相關網站
iPhone SDK Core Web Sites iPhone Dev Center iPhone Developer Program iPhone Tech Talk World Tour Apple Developer Forums: iPhone Development What is the iPhone SDK? iPhone OS – Wikipedia, the free encyclopedia iPhone SDK comparison chart – Engadget The unofficial iPhone SDK: Guide to writing native iPhone applications – iPhone Atlas iPhone SDK Books The iPhone Developer’s Cookbook: Building Applications with the iPhone SDK (Developer’s Library) Beginning iPhone Development:
Posts
加入 iPhone Developer
話說iPhone 因該紅了一年多了… 一直沒機會用到他 直到最近聽到可以加入 iPhone 開發平台 並可以在上面開並發行應用程式而且 還可以賺錢 真是太
Category: javascript
Posts
一堆 width / height
(引用 https://blog.ericsk.org/archives/776#more-776) 記錄一下,以後可以方便自己查詢。 在寫 JavaScript 時最煩的就是計算畫面或是頁面的大小,但是每家瀏覽器提供的內容都不太一樣,所以我就針對幾個瀏覽器
Posts
使用Js來讓IE支援png圖片透明效果
var arVersion = navigator.appVersion.split("MSIE") var version = parseFloat(arVersion[1]) function fixPNG(myImage) { if ((version >= 5.5) && (version < 7) && (document.body.filters)) { var imgID = (myImage.id) ? "id='" + myImage.id + "' " : "" var imgClass = (myImage.className) ? "class='" + myImage.className + "' " : "" var imgTitle = (myImage.title) ? "title='" + myImage.title + "' " : "title='" + myImage.alt + "' " var imgStyle = "display:inline-block;"
Posts
javascript正則表達式中用於replace
正則表達式我經常用,但是用的都是最基礎的,基本上都是用於驗證一個字符串的合理性。例如: var m=”12345″; var n=/^\d+$/; if(n.test(m)) alert(‘ok’); 今天看了一個關於replace方法中用正則
Category: jetson-nano
Posts
Jetson Nano OpenCV 測試
Jetson Nano 最近想來試試我買很久的Jetson Nano在影像應用賞可以玩啥呢?於是就沿著其他大神指導開始玩起OpenCV。 本次主要參考OpenCV 4
Category: jquery
Posts
jQuery 1.4 研究與報導 之個人見解(二)
New .toArray() method
.get()用來轉換陣列,將被移除.
jQuery1.4 請使用.toArray() 不用帶入參數可以自動解析.
jQuery() returns empty set
在舊版jQuery1.3 jQuery() 會回傳整個結構函數.
jQuery1.4 將改善此現象 回傳一個空函數.
PS:保留jQuery().ready() 和 jQuery(function(){}).
jQuery(“TAG”)
快數透過TAG目標定義選取.
CSS
The performance of the .css() method has seen a 2x performance improvement.
.css()速度大幅增長2倍,請看官方圖表.
The performance of the .addClass(), .removeClass(), and .hasClass() methods has seen a 3x performance improvement.
.addClass().removeClass().hasClass()速度大幅增長3倍,請看官方圖表.
Category: lua
Posts
Lua for PHP 實測
繼上一篇 Lua for PHP 安裝,現在來是實測Lua 速度.
素聞Lua 執行效能速度之優異不論是陣列字串運算處理皆在PHP之上,這篇先主要針對Array做實測.
index.php
array_b = $array_b;
//測試PHP物件排序效能
$mtime = explode(' ', microtime());
$starttime = $mtime[1] + $mtime[0];
//var_dump($array_a);
rsort($array_a);
//var_dump($array_a);
$mtime = explode(' ', microtime());
$times=number_format(($mtime[1] + $mtime[0] - $starttime), 8);
//顯示PHP執行結果所需時間
echo "PHP rsort time $times \n";


$mtime = explode(' ', microtime());
$starttime = $mtime[1] + $mtime[0];
//var_dump($array_b);
//測試Lua物件排序效能
$array_b = $lua->test();
//var_dump($array_b);
$mtime = explode(' ', microtime());
$times=number_format(($mtime[1] + $mtime[0] - $starttime), 8);
//顯示Lua執行結果所需時間
echo "Lua array sort time $times \n";
test.lua
function test()
    table.sort( array_b )
    return array_b
end
Posts
Lua for Windows 開發 筆記
下載:Lua 5.2.0-work2 – Release 1
先參考此篇教學Using Lua with C#並去 LuaInterface 下載回來,看了一下注意事項好像必須 Microsoft Visual C++ 2008 可轉散發套件 (x86) 一併下載回來比較保險.
後來找到 luaforwindows Windows底下Lua整合套件.
Posts
Lua for PHP 安裝
主要安裝擴充套件資訊 LUA for PHP 使用 Plua 為安裝源. Linux 安裝方式: 先安裝好 lua: $apt-get install lua5.1 liblua5.1-0-dev 先下載並解開: $ cd /tmp $ wget http://plua.googlecode.com/files/plua-1.0.0.zip $ tar zxvf plua-1.0.0.zip $ cd plua $ phpize $ whereis php-config php-config: /usr/bin/php-config /usr/share/man/man1/php-config.1.gz $ rm -f
Category: mac-osx
Posts
Open Source TextMate 2
TextMate Mac上老牌編輯器功能強大. 最近被 Sublime Text 給超越了. 並於2012/08/09 開源了.發佈於 https://github.com/textmate/textmate 安裝使用方式: brew install ragel boost pgrep multimarkdown hg brew install --HEAD https://raw.github.com/adamv/homebrew-alt/master/head-only/ninja.rb git clone https://github.com/textmate/textmate.git cd textmate ./configure &&
Posts
Redis Key-Value資料庫建置實測
reids
Redis是一個開源的使用ANSI C語言編寫、支援網路、可基於記憶體亦可持久化的日誌型、Key-Value資料庫,並提供多種語言的API。從2010年3月15日起,Redis的開發工作由VMware主持。
通常,Redis將數據存儲於記憶體,或被配置為使用虛擬記憶體。通過兩種方式可以實現數據持久:使用快照的方式,將內存中的數據不斷寫入磁碟;或使用類似MySQL的日誌方式,記錄每次更新的日誌。前者性能較高,但是可能會引起一定程度的數據遺失(後者相反)。
Mac 使用brew安裝reids
-> % brew install redis
==> Downloading http://redis.googlecode.com/files/redis-2.4.8.tar.gz
######################################################################## 100.0%
==> make -C src
==> Caveats
If this is your first install, automatically load on login with:
    mkdir -p ~/Library/LaunchAgents
    cp /usr/local/Cellar/redis/2.4.8/homebrew.mxcl.redis.plist ~/Library/LaunchAgents/
    launchctl load -w ~/Library/LaunchAgents/homebrew.mxcl.redis.plist

If this is an upgrade and you already have the homebrew.mxcl.redis.plist loaded:
    launchctl unload -w ~/Library/LaunchAgents/homebrew.mxcl.redis.plist
    cp /usr/local/Cellar/redis/2.4.8/homebrew.mxcl.redis.plist ~/Library/LaunchAgents/
    launchctl load -w ~/Library/LaunchAgents/homebrew.mxcl.redis.plist

  To start redis manually:
    redis-server /usr/local/etc/redis.conf

  To access the server:
    redis-cli
==> Summary
/usr/local/Cellar/redis/2.4.8: 9 files, 424K, built in 5 seconds
Posts
ZFS on MAC OSX
ZFS 是很好檔案系統,可惜因為種種原因…沒有機會在OSX 上面使用.
MACZFS
是好心人porting到MAC OSX上面,只要下載安裝包下來就可以直接使用.
以下是實際使用方式:
先查看目前磁碟使用狀況.
#  diskutil list
/dev/disk0
   #:                       TYPE NAME                    SIZE       IDENTIFIER
   0:      GUID_partition_scheme                        *500.1 GB   disk0
   1:                        EFI                         209.7 MB   disk0s1
   2:                  Apple_HFS Macintosh HD            300.9 GB   disk0s2
   3:                 Apple_Boot Recovery HD             650.0 MB   disk0s3
   4:                  Apple_HFS data                    198.2 GB   disk0s4
Category: micro-2440
Posts
micro 2440 遠端rs232 控制
想法: 一般使用rs232 over ip 的硬體都不便宜,此次想法將micro 2440版子上的com 1 可以以網路連接方式使用. 而且依照arm 2440這棵c
Posts
micro 2440 開箱 & Embedded Linux 初見面
micro 2440 簡介:(官網簡介) 如圖為 Micro2440 核心板佈局圖,它採用6 層板設計,並使用等長布線以滿足信號完 整性要求。從調試開發和方便維修的角度,我們把主要芯片
Category: php-amp-mysql
Posts
a.Mac OSX[
Using Redis.
Readis
Redis is an open source, BSD licensed, advanced key-value store. It is often referred to as a data structure server since keys can contain strings, hashes, lists, sets and sorted sets.
1.Installation
a.Mac OSX[
 ]1
]1
b.Ubuntu
-> % sudo apt-get install redis-server
Reading package lists... Done
Building dependency tree
Reading state information... Done
The following extra packages will be installed:
  libjemalloc1 redis-tools
The following NEW packages will be installed:
  libjemalloc1 redis-server redis-tools
0 upgraded, 3 newly installed, 0 to remove and 84 not upgraded.
Need to get 410 kB of archives.
After this operation, 1,272 kB of additional disk space will be used.
Do you want to continue? [Y/n] y
Get:1 http://archive.ubuntu.com/ubuntu/ trusty/universe libjemalloc1 amd64 3.5.1-2 [76.8 kB]
Get:2 http://archive.ubuntu.com/ubuntu/ trusty/universe redis-tools amd64 2:2.8.4-2 [65.7 kB]
Get:3 http://archive.ubuntu.com/ubuntu/ trusty/universe redis-server amd64 2:2.8.4-2 [267 kB]
Fetched 410 kB in 2s (176 kB/s)
Selecting previously unselected package libjemalloc1.
(Reading database ... 300693 files and directories currently installed.)
Preparing to unpack .../libjemalloc1_3.5.1-2_amd64.deb ...
Unpacking libjemalloc1 (3.5.1-2) ...
Selecting previously unselected package redis-tools.
Preparing to unpack .../redis-tools_2%3a2.8.4-2_amd64.deb ...
Unpacking redis-tools (2:2.8.4-2) ...
Selecting previously unselected package redis-server.
Preparing to unpack .../redis-server_2%3a2.8.4-2_amd64.deb ...
Unpacking redis-server (2:2.8.4-2) ...
Processing triggers for man-db (2.6.7.1-1) ...
Processing triggers for ureadahead (0.100.0-16) ...
ureadahead will be reprofiled on next reboot
Setting up libjemalloc1 (3.5.1-2) ...
Setting up redis-tools (2:2.8.4-2) ...
Setting up redis-server (2:2.8.4-2) ...
Starting redis-server: redis-server.
Processing triggers for libc-bin (2.19-0ubuntu6) ...
Processing triggers for ureadahead (0.100.0-16) ...
stevelo@stevelo-pc [12:01:47] [~]
Posts
Using Twig with Phalcon PHP and kill it!!
Using Twig with Phalcon PHP.
Twig is a modern template engine for PHP.
Now we can Using Twig with Phalcon.
How to do:
1.Install Twing in library as git submodule.
git submodule add git@github.com:fabpot/Twig.git app/library/Twig
2.Install phalcon incubator in library as git submodule.
git submodule add git@github.com:phalcon/incubator.git app/library/incubator
Posts
Phalcon framework testing
luosteve@SteveMac [10:55:51] [~/tmp]
-> % git clone --depth=1 git://github.com/phalcon/cphalcon.git
Cloning into 'cphalcon'...
remote: Counting objects: 1437, done.
remote: Compressing objects: 100% (971/971), done.
remote: Total 1437 (delta 593), reused 799 (delta 352)
Receiving objects: 100% (1437/1437), 2.08 MiB | 792.00 KiB/s, done.
Resolving deltas: 100% (593/593), done.
Checking connectivity... done.
luosteve@SteveMac [10:56:01] [~/tmp]
-> % cd cphalcon/build
root@SteveMac [10:56:35] [~/tmp/cphalcon/build] [master]
-> # ./install
.
.
.
.
.
.
une=native -O2 -finline-functions -fomit-frame-pointer -fvisibility=hidden   -o phalcon.la -export-dynamic -avoid-version -prefer-pic -module -rpath /Users/luosteve/tmp/cphalcon/build/64bits/modules  phalcon.lo
gcc ${wl}-flat_namespace ${wl}-undefined ${wl}suppress -o .libs/phalcon.so -bundle  .libs/phalcon.o   -march=native -mtune=native
dsymutil .libs/phalcon.so || :
warning: no debug symbols in executable (-arch x86_64)
creating phalcon.la
(cd .libs && rm -f phalcon.la && ln -s ../phalcon.la phalcon.la)
/bin/sh /Users/luosteve/tmp/cphalcon/build/64bits/libtool --mode=install cp ./phalcon.la /Users/luosteve/tmp/cphalcon/build/64bits/modules
cp ./.libs/phalcon.so /Users/luosteve/tmp/cphalcon/build/64bits/modules/phalcon.so
cp ./.libs/phalcon.lai /Users/luosteve/tmp/cphalcon/build/64bits/modules/phalcon.la
----------------------------------------------------------------------
Libraries have been installed in:
   /Users/luosteve/tmp/cphalcon/build/64bits/modules

If you ever happen to want to link against installed libraries
in a given directory, LIBDIR, you must either use libtool, and
specify the full pathname of the library, or use the `-LLIBDIR'
flag during linking and do at least one of the following:
   - add LIBDIR to the `DYLD_LIBRARY_PATH' environment variable
     during execution

See any operating system documentation about shared libraries for
more information, such as the ld(1) and ld.so(8) manual pages.
----------------------------------------------------------------------

Build complete.
Don't forget to run 'make test'.

Installing shared extensions:     /Users/luosteve/.phpbrew/php/php-5.5.10/lib/php/extensions/no-debug-non-zts-20121212/

Thanks for compiling Phalcon!
Build succeed: Please restart your web server to complete the installation
./install  27.78s user 3.81s system 99% cpu 31.690 total
Posts
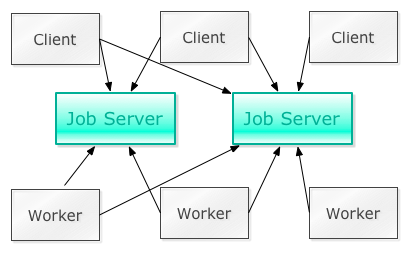
你所應用Gearman[
Gearman 不一樣的用法~~
Gearman
你所知道的Gearman
可以導入大量數據、發送許多電子郵件、編碼視頻文件、挖據數據並構建一個中央日誌設施 — 所有這些均不會影響站點的體驗和響應性。可以並行地處理數據。而且,由於 Gearman 協議是獨立於語言和平台的,所以您可以在解決方案中混合編程語言。比如,可以用 PHP 編寫一個 producer,用 C、Ruby 或其他任何支持 Gearman 庫的語言編寫 worker。
你所應用Gearman[
 ]1
]1
Posts
PHP extension Redis 安裝使用
PHP extension Redis 安裝使用
安裝 PHP extension for Redis 使PHP可以與Redis運作.
安裝
$ cd /tmp
$ git clone git://github.com/nicolasff/phpredis.git
$ cd /tmp/phpredis
$ phpize
$ ./configure
$ make
$ make install clean
#編輯 php.ini加入
extension=redis.so
Posts
Redis Key-Value資料庫建置實測
reids
Redis是一個開源的使用ANSI C語言編寫、支援網路、可基於記憶體亦可持久化的日誌型、Key-Value資料庫,並提供多種語言的API。從2010年3月15日起,Redis的開發工作由VMware主持。
通常,Redis將數據存儲於記憶體,或被配置為使用虛擬記憶體。通過兩種方式可以實現數據持久:使用快照的方式,將內存中的數據不斷寫入磁碟;或使用類似MySQL的日誌方式,記錄每次更新的日誌。前者性能較高,但是可能會引起一定程度的數據遺失(後者相反)。
Mac 使用brew安裝reids
-> % brew install redis
==> Downloading http://redis.googlecode.com/files/redis-2.4.8.tar.gz
######################################################################## 100.0%
==> make -C src
==> Caveats
If this is your first install, automatically load on login with:
    mkdir -p ~/Library/LaunchAgents
    cp /usr/local/Cellar/redis/2.4.8/homebrew.mxcl.redis.plist ~/Library/LaunchAgents/
    launchctl load -w ~/Library/LaunchAgents/homebrew.mxcl.redis.plist

If this is an upgrade and you already have the homebrew.mxcl.redis.plist loaded:
    launchctl unload -w ~/Library/LaunchAgents/homebrew.mxcl.redis.plist
    cp /usr/local/Cellar/redis/2.4.8/homebrew.mxcl.redis.plist ~/Library/LaunchAgents/
    launchctl load -w ~/Library/LaunchAgents/homebrew.mxcl.redis.plist

  To start redis manually:
    redis-server /usr/local/etc/redis.conf

  To access the server:
    redis-cli
==> Summary
/usr/local/Cellar/redis/2.4.8: 9 files, 424K, built in 5 seconds
Posts
FuelPHP FrameWork 進入! Enter~~
安裝之前有說過哩:請參考 FuelPHP FrameWork 初體驗~~
之前說過 作者將APP 整個包在FrameWork 內的蠢話. 我可以不承認嗎XDD
其實算是給開發人員快速進入,實作體驗FrameWork用的.
如果要自行快速分離請先參考 同事強做:【程式筆記】建立一個FuelPHP的應用程式Git Repository
如果這樣不能滿足你,接下來江示範如何調整.
Posts
FuelPHP FrameWork 初體驗~~
FuelPHP is a simple, flexible, community driven PHP 5.3 web framework based on the best ideas of other frameworks with a fresh start.
FuelPHP 衝著他以php 5.3 並以namespace 方式開發,輕量化FrameWork趕快來試用看看吧.
安裝
安裝方式不免俗來了,快速按裝.(不錯唷)
$ curl get.fuelphp.com/oil | sh
  % Total    % Received % Xferd  Average Speed   Time    Time     Time  Current
                                 Dload  Upload   Total   Spent    Left  Speed
100   244  100   244    0     0    240      0  0:00:01  0:00:01 --:--:--  1257
Password:

$
Posts
Gearman Install on Ubuntu
gearman 在ubuntu 上不知哪個版本已無提供libdrizzlea模組. 導致要使用myql作為資料源已無法使用. 以下是自行編譯安裝方式: $ sudo -s $ add-apt-repository
Posts
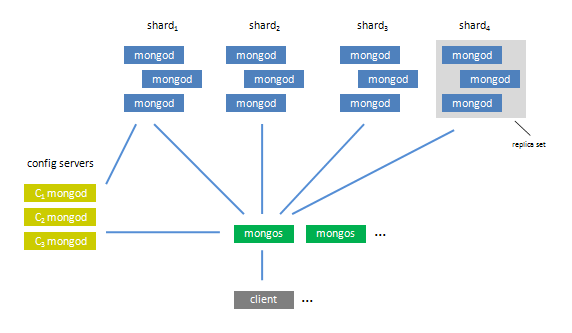
MongoDB Sharing
MongoDB Sharing[
 ]1
]1
可以先看看官網介紹:Sharding Introduction
Shards 類似 Mysql 的Data nodes.
Config Servers 類似 Mysql 的Management node.
Routing Processes 類似 Mysql 的SQL node.
Posts
MongoDB VS Mysql 簡單測試.
廢話不多說.
MongoDB 使用 MongoDB Object Document Mapper測試.
Mysql 使用 Object Relational Mapper測試.
MongoDB部分:
config.php
register();

$classLoader = new ClassLoader('Doctrine\ODM\MongoDB', __DIR__ . '/../../lib');
$classLoader->register();

$classLoader = new ClassLoader('Doctrine\MongoDB', __DIR__ . '/../../lib/vendor/doctrine-mongodb/lib');
$classLoader->register();

$classLoader = new ClassLoader('Symfony', __DIR__ . '/../../lib/vendor');
$classLoader->register();

$classLoader = new ClassLoader('Documents', __DIR__);
$classLoader->register();

$config = new Configuration();

$config->setProxyDir(__DIR__ . '/Proxies');
$config->setProxyNamespace('Proxies');

$config->setHydratorDir(__DIR__ . '/Hydrators');
$config->setHydratorNamespace('Hydrators');

$config->setDefaultDB('doctrine_odm_sandbox');
//使用safe模式
$con = new Connection('localhost',array('safe'=>true, 'w' => 2,'wtimeoutMS' => 2000));
//使用一般模式
//$con = new Connection('localhost');

$reader = new AnnotationReader();
$reader->setDefaultAnnotationNamespace('Doctrine\ODM\MongoDB\Mapping\\');
$config->setMetadataDriverImpl(new AnnotationDriver($reader, __DIR__ . '/Documents'));

$dm = DocumentManager::create($con, $config);
Posts
Lua for PHP 實測
繼上一篇 Lua for PHP 安裝,現在來是實測Lua 速度.
素聞Lua 執行效能速度之優異不論是陣列字串運算處理皆在PHP之上,這篇先主要針對Array做實測.
index.php
array_b = $array_b;
//測試PHP物件排序效能
$mtime = explode(' ', microtime());
$starttime = $mtime[1] + $mtime[0];
//var_dump($array_a);
rsort($array_a);
//var_dump($array_a);
$mtime = explode(' ', microtime());
$times=number_format(($mtime[1] + $mtime[0] - $starttime), 8);
//顯示PHP執行結果所需時間
echo "PHP rsort time $times \n";


$mtime = explode(' ', microtime());
$starttime = $mtime[1] + $mtime[0];
//var_dump($array_b);
//測試Lua物件排序效能
$array_b = $lua->test();
//var_dump($array_b);
$mtime = explode(' ', microtime());
$times=number_format(($mtime[1] + $mtime[0] - $starttime), 8);
//顯示Lua執行結果所需時間
echo "Lua array sort time $times \n";
test.lua
function test()
    table.sort( array_b )
    return array_b
end
Posts
MongoDB 新手入門筆記~
Linux 安裝: $ apt-get install mongodb-server mongodb-dev $ sudo pecl install mongo 編輯php設定檔 加入 extension=mongo.so php -m 即可以看到安裝好的擴充套件. FreeBSD 安裝: $ cd /usr/ports/databases/mongodb ; make install clean ; $ cd /usr/ports/databases/pecl-mongo ; make install clean ; php -m 即可以看到安裝
Posts
Lua for PHP 安裝
主要安裝擴充套件資訊 LUA for PHP 使用 Plua 為安裝源. Linux 安裝方式: 先安裝好 lua: $apt-get install lua5.1 liblua5.1-0-dev 先下載並解開: $ cd /tmp $ wget http://plua.googlecode.com/files/plua-1.0.0.zip $ tar zxvf plua-1.0.0.zip $ cd plua $ phpize $ whereis php-config php-config: /usr/bin/php-config /usr/share/man/man1/php-config.1.gz $ rm -f
Posts
Zend Framework 1.11.0 and Doctrine 1.2.3 and Smarty 3.0.4
懶惰許久~~ 趕快來補一下功課.
這篇主要介紹 Zend Framework 1.11.0 and Doctrine 1.2.3 and Smarty 3.0.4 的結合方式.
Doctrine 1.2.3 跟 Zend Framework 1.11.0 結合主要參考 http://pastie.org/481633 http://pastie.org/481635 使用.
目錄結構:[
]1
Posts
FreeBSD 上使用 wkhtmltopdf 做網頁擷取
以往要用程式控制將網頁輸出pdf或擷取網頁,都是件浩大工程.
這次介紹如何在FreeBSD 命令列模式下即可輕易辦到,並且不需龐大的X Windows 圖形系統適合在server上跑.
以下是軟體原文介紹.
wkhtmltopdf
Convert html to pdf using webkit (qtwebkit)
Description
Simple shell utility to convert html to pdf using the webkit rendering engine, and qt.
Introduction
Searching the web, I have found several command line tools that allow you to convert a HTML-document to a PDF-document, however they all seem to use their own, and rather incomplete rendering engine, resulting in poor quality. Recently QT 4.4 was released with a WebKit widget (WebKit is the engine of Apples Safari, which is a fork of the KDE KHtml), and making a good tool became very easy.
此軟體使用WebKit開發完成,除了flash以外其他接可正常顯示!!(包含js)
在安裝前請先確定你的FreeBSD已安裝 linux-base 套件並正常使用,並且將port tree更新.
Posts
Zend Framework multidb 不好用我自己來 Mudb
源由 Zend Framework 的 multidb 有用過因該知道,只是可以把多跟資料庫加入連結 要用時候在拿出其中之一DB來用. 有做過大型連結資料庫的使用著因該深有同感. 你們常做的
Posts
Zend Framework + Smarty3 整合應用
承上篇 Zend Framework + Smarty2 + Smarty3 整合應用 我曾說過:之前有使用過ZFDebug 感受到整合便利性 所以對之前整合不甚滿意. 來看看最新版本~ 將附件內的Smarty
Posts
Zend Framework + Smarty2 + Smarty3 整合應用
在你開始閱讀前請先前往鐵神:Smarty 2 整合到 Zend Framework 1.10 閱讀完畢並了解. 之前有使用過ZFDebug 感受到整合便利性,於是在整合Sarmty 時想
Posts
Zend Famework 1.10.3 + ZFDebug
對基本架構不了解可先前往 鐵神: http://www.jaceju.net/blog/?p=1077 此架構為快速架構起始專案的設定 application.ini 內容 [production] phpSettings.display_startup_errors = 0 phpSettings.display_errors = 0 includePaths.library = APPLICATION_PATH "/../library" bootstrap.path = APPLICATION_PATH "/Bootstrap.php" bootstrap.class = "Bootstrap" appnamespace = "Application" resources.frontController.controllerDirectory = APPLICATION_PATH "/controllers" resources.frontController.params.displayExceptions = 0 ;resources.frontController.noViewRenderer = 1 autoloadernamespaces[] = "ZFDebug" ;Stand Databse
Posts
FreeBSD NGINX + PHP5
先去官網找到freebsd專用的port http://php-fpm.org/downloads/freebsd-port/ # fetch http://php-fpm.org/downloads/php-5.2.10-fpm-0.5.13.diff.gz # mv php-5.2.10-fpm-0.5.13.diff.gz /usr/ports/distfiles/ # fetch http://files.directadmin.com/services/custombuild/php-5.2.9-mail-header.patch # mv php-5.2.9-mail-header.patch /usr/ports/distfiles/ # fetch http://php-fpm.org/downloads/freebsd-port/php-5.2.10-fpm-0.5.13.tar.gz php-5.2.10-fpm-0.5.13.tar.gz 100% of 9503 B 45 kBps # tar zxvf php-5.2.10-fpm-0.5.13.tar.gz -C /usr/ports/lang x php5-fpm/ x php5-fpm/files/ x php5-fpm/Makefile x php5-fpm/distinfo x php5-fpm/pkg-descr x php5-fpm/pkg-plist x php5-fpm/files/php-fpm.sh.in x php5-fpm/files/patch-scripts::phpize.in x php5-fpm/files/patch-TSRM_threads.m4 x
Posts
Loadfile Class PHP效能增進
前些日子有參加,WEB效能增進的研討會. 思考PHP效能進化,不外乎找套件使用他愛他. 阿勒 怎摸沒有人做東西去改變他?? 回歸問題點當每個人都有辦
Posts
改造 ZF架構呼叫檔案方式
[ ][1] (點圖看大圖) 加了自己的 loadfiles class 改掉ZF LOADER 內的 static function loadFile 的 include 改為我的loadfiles class. 有看過原圖的人會發現大不同了. 原架構的ZF執行狀況[ ][2] *
Posts
安裝php mssql 模組 使用FreeTDS編譯遇到的問題
freetds-0.82 目前檔案有所變動以致變異上造成錯誤 必須修改 ext/mssql/config.m4 檔案 Revision 1.9.2.2.2 Revision 1.9.2.2.2.1 1 dnl 1 dnl 2 dnl $Id: config.m4,v 1.9.2.2.2.2 2008/10/04 13:19:22 felipe Exp $ 2 dnl $Id: config.m4,v 1.9.2.2.2.1 2007/07/03 17:25:34 sniper Exp $ 3 dnl 3 dnl 4 4 5 PHP_ARG_WITH(mssql,for MSSQL support via FreeTDS, 5 PHP_ARG_WITH(mssql,for MSSQL
Posts
MySQL Master/Slave Server (Replication Database)
MySQL 提供 Master/Slave 機制讓您輕易的完成多個 MySQL Server 之間的資料同步,有了多個資料同步的 MySQL Server 在管理上會較有彈性,例如你可以建置備援主機或是進行負載平衡等等。但是
Posts
ajax跟蹤文件上傳進度條
(文件來源 http://www.ibm.com/developerworks/cn/opensource/os-php-v525/index.html) 2007 年 6 月 08 日 PHP V5.2 為開發人員添加了 hook 以利用實時跟蹤文件上傳進度的功能。本文是 系列文章(共五部分)的第 5 部分,將向您展示如何監視文件
Posts
PHP MySQL Tips
Continuing from my earlier post on PHP performance, I thought I’d share a few Mysql tips that I’ve learnt over the years. Hope it helps someone and please leave a comment with your own tips or provide any corrections to the ones mentioned. Word searching 1.
SELECT * FROM TABLE WHERE MATCH (`field`) AGAINST ('Keyword') (Fastest)
2.
SELECT * FROM TABLE WHERE MATCH (`field`) AGAINST ('+Keyword' IN BOOLEAN MODE) (Fast)
Posts
IE中打開UTF-8編碼title為中文的網頁會顯示空白頁的問題
(忘了引用來源) 很久很久以前(大概2005年10月 ~2006年3月),當時在blogger.com寫Blog。當時blogger.com有中
Posts
月曆
STYLE TYPE=”text/css”> a{text-decoration:none} <!– BODY { font-size: 12px; color:gray; text-decoration: none; font-family: Arial, Verdana, Helvetica, sans-serif; SCROLLBAR-FACE-COLOR: #fcfcd8; SCROLLBAR-HIGHLIGHT-COLOR: #fcfcd8; SCROLLBAR-SHADOW-COLOR: #fcd8b4; SCROLLBAR-3DLIGHT-COLOR: #fcd890; SCROLLBAR-ARROW-COLOR: #fcd800; SCROLLBAR-TRACK-COLOR: #fcfcd8; SCROLLBAR-DARKSHADOW-COLOR: #fcd8b4; SCROLLBAR-BASE-COLOR: #fcfcd8} A:link { font-size: 12px; color=#66ccff;} A:alink { font-size: 12px; color=#66ccff;} A:visited { font-size: 12px; color=#333333;} A:hover{ font-size: 12px; color=#fcd800; text-decoration: underline overline} TABLE { font-size: 12px } TD { font-size: 12px } –> <?php $y = date(“Y”) ;?>
Posts
亂數取碼當成驗證碼的問題
//此副程式的功能在於生成驗證碼圖片 //重設亂數種子 srand((double)microtime()*1000000); //產生一組6位數的數字 $abc=substr(md5(uniqid(rand())),mt_rand(0,15),6); //建立一個 80*30 畫素的圖形 $img = imagecreate(80,30); //設定顏色 $white = imageco
Posts
如何秀出複數的排序條件資料
SELECT * FROM Product ORDER BY SellDate DESC 因為資料的SellDate可能同時會有幾十筆都相同,我希望可以在篩選出這批資料後在更詳細的依照他們的編號去做排序…
Posts
PHP GooGle PageRank程式
<?php // Google PageRank Calculator function by ZeNiTRaM – version 0.1 // Licensed under the GPL License // eMail me at zenitram [AT] dubmail.net // Uses code from The Google Checksum Calculator, by Alex Stapleton, Andy Doctorow, Vijay “Cyberax” Bhatter, and a few others, licensed under the public domain (http://www.mobileread.com/forums/showpost.php?p=7769&postcount=87) and XMLize.php by Hans Anderson (http://www.hansanderson.com/php/xml/). // Use: $pagerank = GetPagerank(“http://www.google.es”); // GetPagerank returns a STRING with the Pagerank number
Category: python
Posts
PyMSN Python 開發的MSN 模組 (一)基本介紹
安裝可以參考 閃光的 BLOG https://blog.hinablue.me/794 基本使用介紹: 使用命令列執行 可以加 2個參數 1.帳號 2.密碼 EXAMPLE:python test.py aaaa@hotmail 123123123 Log可自行調配 是否輸出存檔 在使用任何 套件模組 像這種
Category: ruby
Posts
FreeBSD 安裝使用RVM
FreeBSD 安裝使用RVM $ wget --no-check-certificate https://raw.github.com/wayneeseguin/rvm/master/binscripts/rvm-installer $ chmod +x rvm-installer $ ./rvm-installer --version latest
Posts
Ruby Version Manager
Ruby Version Manager
介紹
最近同事都在看Ruby,想說跟進一下神人們的腳步.看看是不是可以開竅點@@
Ruby 依照以前安裝套件經驗,版本是最難搞的.
慶幸有很多開發人員先鋒,做的很多貢獻.
如今才有RVM Ruby Version Manager 誕生!!解決很多初學者很多困擾障礙.
RVM是一套Ruby版本控管可以在各版號切換.甚至自定版號與安裝套件之間切換.
Category: zend-framework
Posts
Zend Framework 2.0 的一點筆記AutoLoader HelperBroker
此筆記心得:
AutoLoader改變:
require_once 'Zend/Loader/StandardAutoloader.php';
$loader = new Zend\Loader\StandardAutoloader();
$loader->registerNamespace('ZFDebug', __DIR__ . '/../library/ZFDebug')
           ->registerPrefix('Phly_', __DIR__ . '/../library/Phly');
 $loader->register();
Posts
Zend Framework 2.0 體驗~
Zend Framework 2.0 使用前請先參觀ZF2 wiki 安裝方式 前往GIT 作clone 動作取得整個程式. 使用方式 依照正常使用方式 zf create project test1….etc 設定檔與ZF1 不同之處 resources.db.adapter = "pdo_mysql" resources.db.params.host =
Posts
Zend Framework 以sub domain 為基準 routes
以Zend Framework 建置專案大部分的 routes:
http://www.test.tw/module/controller/action
例如:
http://www.test.tw/index/main/frontpage
則:
module 為 index
controller 為 main
action 為 frontpage
Posts
Doctrine 入門(一)
準備
依照之前整合的 Zend Framework 1.11.0 and Doctrine 1.2.3 and Smarty 3.0.4 環境,來做學習與測試.
更改index.php
  application.ini 環境


;Doctrine
autoloaderNamespaces[] = "Doctrine_"
pluginPaths.ZendX_Doctrine_Application_Resource = "ZendX/Application/Resource"
resources.doctrine.debug = 1
resources.doctrine.paths.models_path = APPLICATION_PATH "/../models"
resources.doctrine.connections.orm1.dsn.adapter = mysql
resources.doctrine.connections.orm1.dsn.user = "user"
resources.doctrine.connections.orm1.dsn.pass = "password"
resources.doctrine.connections.orm1.dsn.hostspec = "localhost"
resources.doctrine.connections.orm1.dsn.database = "orm1_sd_idv_tw"
Posts
Zend Framework 1.11.0 and Doctrine 1.2.3 and Smarty 3.0.4
懶惰許久~~ 趕快來補一下功課.
這篇主要介紹 Zend Framework 1.11.0 and Doctrine 1.2.3 and Smarty 3.0.4 的結合方式.
Doctrine 1.2.3 跟 Zend Framework 1.11.0 結合主要參考 http://pastie.org/481633 http://pastie.org/481635 使用.
目錄結構:[
]1
Posts
Zend Framework multidb 不好用我自己來 Mudb
源由 Zend Framework 的 multidb 有用過因該知道,只是可以把多跟資料庫加入連結 要用時候在拿出其中之一DB來用. 有做過大型連結資料庫的使用著因該深有同感. 你們常做的
Posts
Zend Framework + Smarty3 整合應用
承上篇 Zend Framework + Smarty2 + Smarty3 整合應用 我曾說過:之前有使用過ZFDebug 感受到整合便利性 所以對之前整合不甚滿意. 來看看最新版本~ 將附件內的Smarty
Posts
Zend Framework + Smarty2 + Smarty3 整合應用
在你開始閱讀前請先前往鐵神:Smarty 2 整合到 Zend Framework 1.10 閱讀完畢並了解. 之前有使用過ZFDebug 感受到整合便利性,於是在整合Sarmty 時想
Posts
Zend Famework 1.10.3 + ZFDebug
對基本架構不了解可先前往 鐵神: http://www.jaceju.net/blog/?p=1077 此架構為快速架構起始專案的設定 application.ini 內容 [production] phpSettings.display_startup_errors = 0 phpSettings.display_errors = 0 includePaths.library = APPLICATION_PATH "/../library" bootstrap.path = APPLICATION_PATH "/Bootstrap.php" bootstrap.class = "Bootstrap" appnamespace = "Application" resources.frontController.controllerDirectory = APPLICATION_PATH "/controllers" resources.frontController.params.displayExceptions = 0 ;resources.frontController.noViewRenderer = 1 autoloadernamespaces[] = "ZFDebug" ;Stand Databse
Posts
改造 ZF架構呼叫檔案方式
[ ][1] (點圖看大圖) 加了自己的 loadfiles class 改掉ZF LOADER 內的 static function loadFile 的 include 改為我的loadfiles class. 有看過原圖的人會發現大不同了. 原架構的ZF執行狀況[ ][2] *
Posts
Zend Framework(一)
Zend Framework 屁話:寫這些東西是一方面紀錄,並希望再寫完文章時成功開發一個專案. Zend Framework 我認為他是眾多”工具”的一個代表. 工具不就
Category: 剪輯
Posts
Final Cut Pro X 10.4.9 配置測試
Final Cut Pro X 10.4.9 最近幾天 Final Cut Pro X 更新到 10.4.9 很多新功能,包含代理可以使用H264等等很多更新。 個人做點測試主要種點在了解到手邊電腦工具適合做怎樣使用,
Category: 工作
Posts
工作上用的工具整理
Putty 中文版 winscp406 Cisco uBR Templates cacti_data_query_snmp_cisco_cmts[]5 蒐集的 MIBSfile
Category: 工具
Posts
受保護的內容: WinAgents.MIB.Browser
WinAgents.MIB.Browser.v1.0.1.1260 WinAgents.MIB.Browser.v1.0.1.1260-Crack
Category: 未分類
Posts
安裝使用phalcon-devtools[
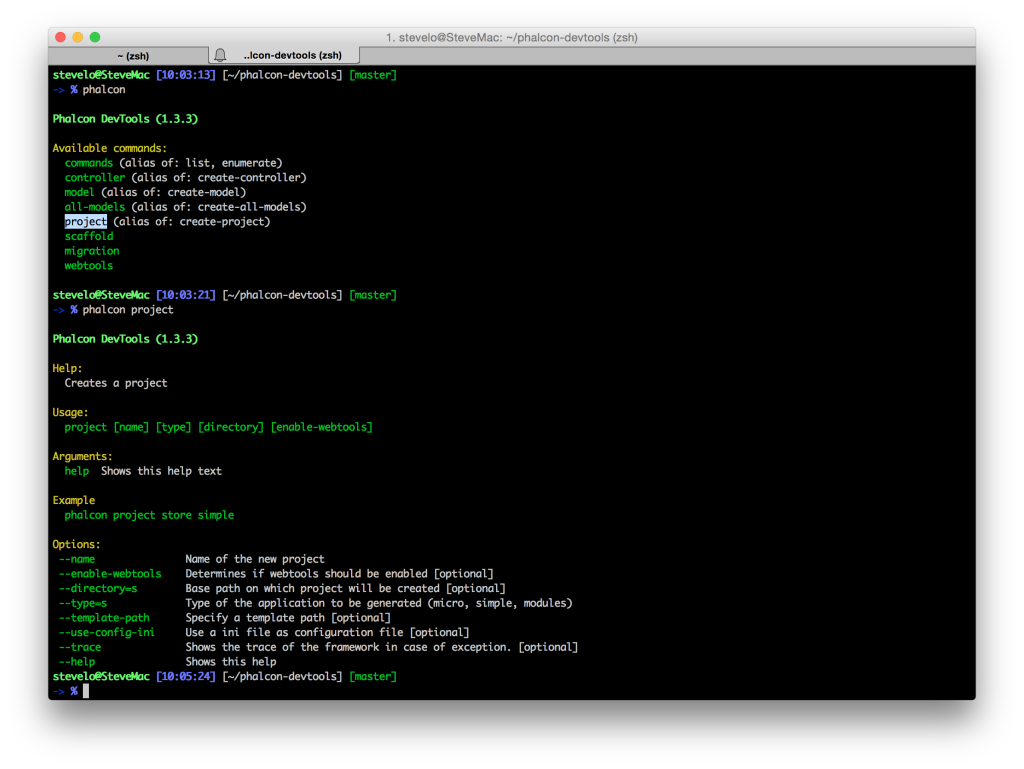
phalcon-devtools 增加專案樣板
phalcon-devtools 增加專案樣板
之前phpconf 有會眾提到說是否自行增加樣版?基本上不會有問題而且開發團隊有增加樣版也都還沒補上.
接下來會簡單講解如何加入自行樣板.
安裝使用phalcon-devtools[
 ]1
]1
Posts
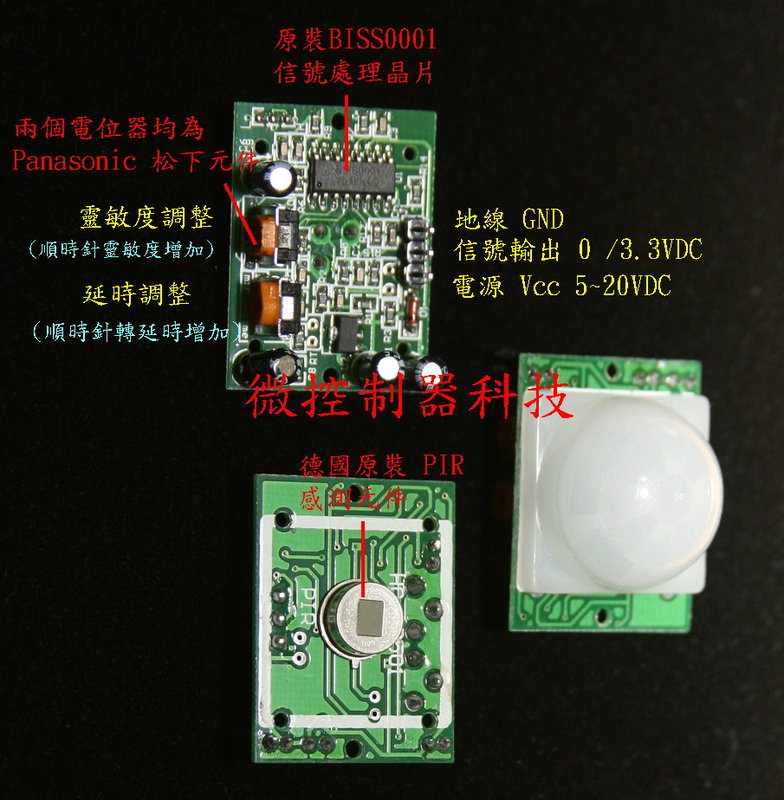
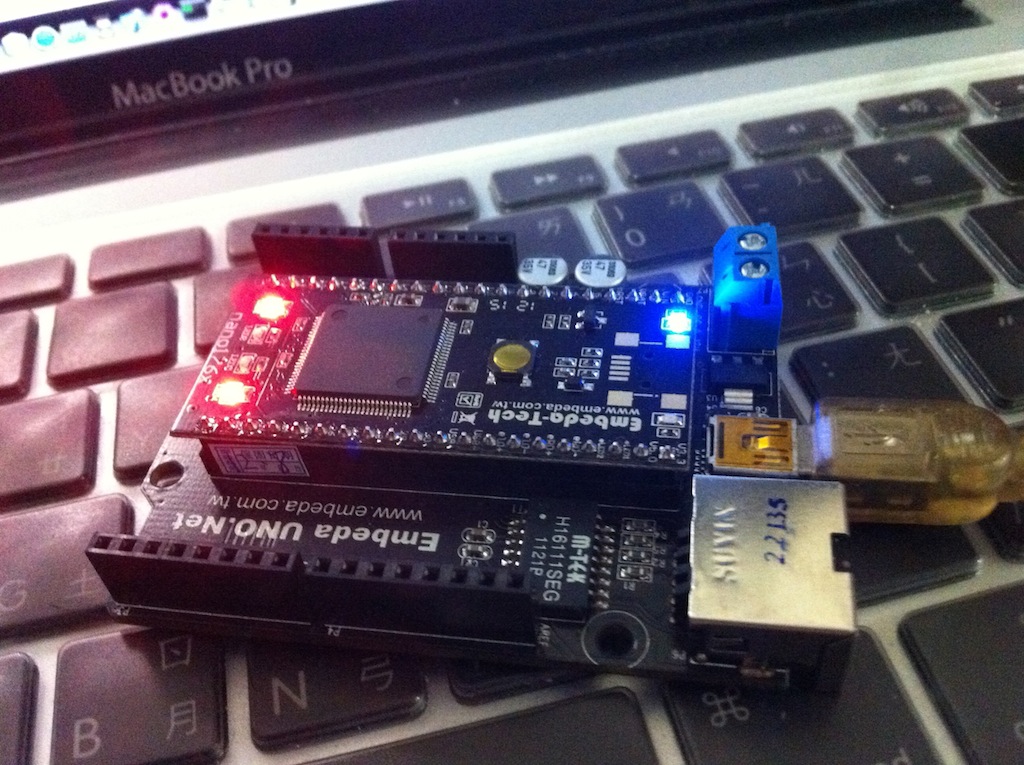
Embeda UNO.Net新手測試!! 接 熱釋紅外線感應 BISS0001
之前介紹過Embeda 現在來實際玩玩.
逛了網拍 找到 人體紅外線感應模組 熱釋紅外線感應 BISS0001來試試.[
 ]1
]1
Posts
接下來直接開箱:[
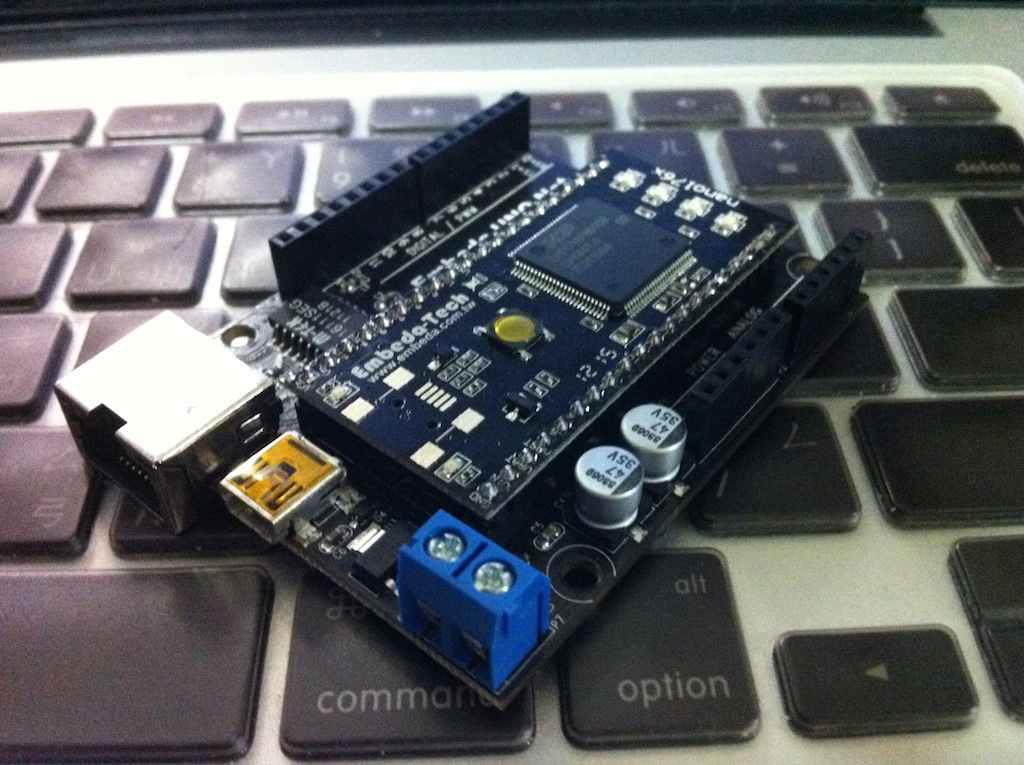
Embeda(mbed) 介紹 & Mac 10.8 開發使用
Embeda 是由國內廠商,於知名mbed所開發而來的.相容原有mbed系統(目前我測試是這樣的)資源豐富.
而mbed(MCU微控制器)類似於Arduino 都屬於簡單易用可快速架構開發.
各位可以前往官網查詢購買方式.
http://www.embeda.com.tw/tw/
接下來直接開箱:[
 ]1
]1
(收到的樣子,大家可以看到實際大小實在夠迷你!!)[
 ][2][
][2][
 ]3
]3
(整個控制版)[
 ]4
]4
(接上usb即可使用)
Posts
Phalcon !! 以C開發的php freamwork!!
Phalcon is a C extension so you need to download a binary for your platform or compile it from source code. 看完這句,再去看 官方的數據. Framework Benchmark 這完全拋開PHP!!!的包袱. 安裝方式 ##Ubuntu必須先確認 安
Posts
Redis Key-Value資料庫建置實測
reids
Redis是一個開源的使用ANSI C語言編寫、支援網路、可基於記憶體亦可持久化的日誌型、Key-Value資料庫,並提供多種語言的API。從2010年3月15日起,Redis的開發工作由VMware主持。
通常,Redis將數據存儲於記憶體,或被配置為使用虛擬記憶體。通過兩種方式可以實現數據持久:使用快照的方式,將內存中的數據不斷寫入磁碟;或使用類似MySQL的日誌方式,記錄每次更新的日誌。前者性能較高,但是可能會引起一定程度的數據遺失(後者相反)。
Mac 使用brew安裝reids
-> % brew install redis
==> Downloading http://redis.googlecode.com/files/redis-2.4.8.tar.gz
######################################################################## 100.0%
==> make -C src
==> Caveats
If this is your first install, automatically load on login with:
    mkdir -p ~/Library/LaunchAgents
    cp /usr/local/Cellar/redis/2.4.8/homebrew.mxcl.redis.plist ~/Library/LaunchAgents/
    launchctl load -w ~/Library/LaunchAgents/homebrew.mxcl.redis.plist

If this is an upgrade and you already have the homebrew.mxcl.redis.plist loaded:
    launchctl unload -w ~/Library/LaunchAgents/homebrew.mxcl.redis.plist
    cp /usr/local/Cellar/redis/2.4.8/homebrew.mxcl.redis.plist ~/Library/LaunchAgents/
    launchctl load -w ~/Library/LaunchAgents/homebrew.mxcl.redis.plist

  To start redis manually:
    redis-server /usr/local/etc/redis.conf

  To access the server:
    redis-cli
==> Summary
/usr/local/Cellar/redis/2.4.8: 9 files, 424K, built in 5 seconds
Posts
Gearman Install OSX
安裝Gearman 在OSX上面 $ sudo -s $ cd /tmp $ wget https://github.com/downloads/libevent/libevent/libevent-2.0.15-stable.tar.gz $ tar zxvf libevent-2.0.15-stable.tar.gz $ cd libevent-2.0.15-stable $ ./configure $ make $ make install $ cd .. $ wget https://launchpad.net/ubuntu/lucid/+source/libdrizzle/0.7-1/+files/libdrizzle_0.7.orig.tar.gz $ tar libdrizzle_0.7.orig.tar.gz $ cd libdrizzle-0.7/ $ ./configure $ make $ make install $ cd .. $ wget http://launchpad.net/gearmand/trunk/0.14/+download/gearmand-0.14.tar.gz $ tar zxvf gearmand-0.14.tar.gz $ cd gearmand-0.14/
Posts
MongoDB VS Mysql 簡單測試.
廢話不多說.
MongoDB 使用 MongoDB Object Document Mapper測試.
Mysql 使用 Object Relational Mapper測試.
MongoDB部分:
config.php
register();

$classLoader = new ClassLoader('Doctrine\ODM\MongoDB', __DIR__ . '/../../lib');
$classLoader->register();

$classLoader = new ClassLoader('Doctrine\MongoDB', __DIR__ . '/../../lib/vendor/doctrine-mongodb/lib');
$classLoader->register();

$classLoader = new ClassLoader('Symfony', __DIR__ . '/../../lib/vendor');
$classLoader->register();

$classLoader = new ClassLoader('Documents', __DIR__);
$classLoader->register();

$config = new Configuration();

$config->setProxyDir(__DIR__ . '/Proxies');
$config->setProxyNamespace('Proxies');

$config->setHydratorDir(__DIR__ . '/Hydrators');
$config->setHydratorNamespace('Hydrators');

$config->setDefaultDB('doctrine_odm_sandbox');
//使用safe模式
$con = new Connection('localhost',array('safe'=>true, 'w' => 2,'wtimeoutMS' => 2000));
//使用一般模式
//$con = new Connection('localhost');

$reader = new AnnotationReader();
$reader->setDefaultAnnotationNamespace('Doctrine\ODM\MongoDB\Mapping\\');
$config->setMetadataDriverImpl(new AnnotationDriver($reader, __DIR__ . '/Documents'));

$dm = DocumentManager::create($con, $config);
Posts
FreeBSD 架設 redmine
redmine 安裝:
1.先更新本機的port tree
$ portsnap fetch update
2.安裝
cd /usr/ports/www/redmine; make install clean
Posts
FreeBSD DenyHosts 擋掉暴力破解 ssh 的使用者
# cd /usr/ports/security/denyhosts; make install clean;
-------------------------------------------------------------------------------
To run denyhosts from startup, add denyhosts_enable="YES"
in your /etc/rc.conf.
Configiration options can be found in /usr/local/etc/denyhosts.conf
-------------------------------------------------------------------------------
In order to proper working of denyhosts
1. edit your /etc/hosts.allow file and add:
sshd : /etc/hosts.deniedssh : deny
sshd : ALL : allow
2. issue the following command if /etc/hosts.deniedssh does not exist yet
touch /etc/hosts.deniedssh
-------------------------------------------------------------------------------
Warning:

syslogd should ideally be run with the -c option; this will ensure that
denyhosts notices multiple repeated login attempts.

To do this, add syslogd_flags="-c" to /etc/rc.conf
-------------------------------------------------------------------------------
===> Installing rc.d startup script(s)
===>   Registering installation for denyhosts-2.6_3
===>  Cleaning for denyhosts-2.6_3
#
Posts
VirtualBox-OSE on FrreeBSD 免x11
參考 http://d.hatena.ne.jp/wittro/20100617/1276782079 cd /usr/src make build32 install32; ldconfig -v -m -R /usr/lib32 cd /usr/ports/emulators/virtualbox-ose make install clean ============================================================================= VirtualBox was installed. You need to load the vboxdrv kernel module via /boot/loader.conf: vboxdrv_load="YES" For bridged networking please add the following line to your /etc/rc.conf: vboxnet_enable="YES" Reboot the machine to load the needed kernel modules. You also have to add all users to your vboxusers group in order to use vbox.
Posts
PHPUnit
PHPUnit 介紹 PHPUnit 其實是個 PHP 寫成的 Framework , 主要功能就是自動對我們所寫的PHP程式做輸入輸出的檢查 一個方便的工具來幫我們自動測試 , 而 PHPUnit 就可以讓我們自行撰寫測
Category: 系統架構-system-architecture
Posts
EDA 事件驅動架構 Event-driven Architecture
事件驅動架構 來談談事件驅動架構與一般架構設計上有何不同與差異。 一般程式架構 一般專案架構來說,會有幾個部分。 程式 主要商業邏輯部分。 與資料庫連結
Posts
NATS 應用(一)
NATS 應用(一) 今天來介紹我對於NATS首次應用的方式與想法。 安裝 測試使用Docker $ docker pull nats:latest latest: Pulling from library/nats f3c8f35bd9bc: Pull complete 4ba25f2430b4: Pull complete Digest: sha256:83922f11aa2012176cc23401cc1a7648c6d0aeecd1597e04c04d1028908d155c Status: Downloaded newer image for nats:latest docker.io/library/nats:latest 執行與啟動 $
Posts
Messaging System 訊息發送系統
今天來聊聊 Messaging System 現今系統架構尚不可忽視的重點沒有之一。談談近年來蓬勃發展軟體產業Internet of Things (IoT), AI, machine learning, blockchainand smart contracts 這三個重點軟體產業其快速與訊